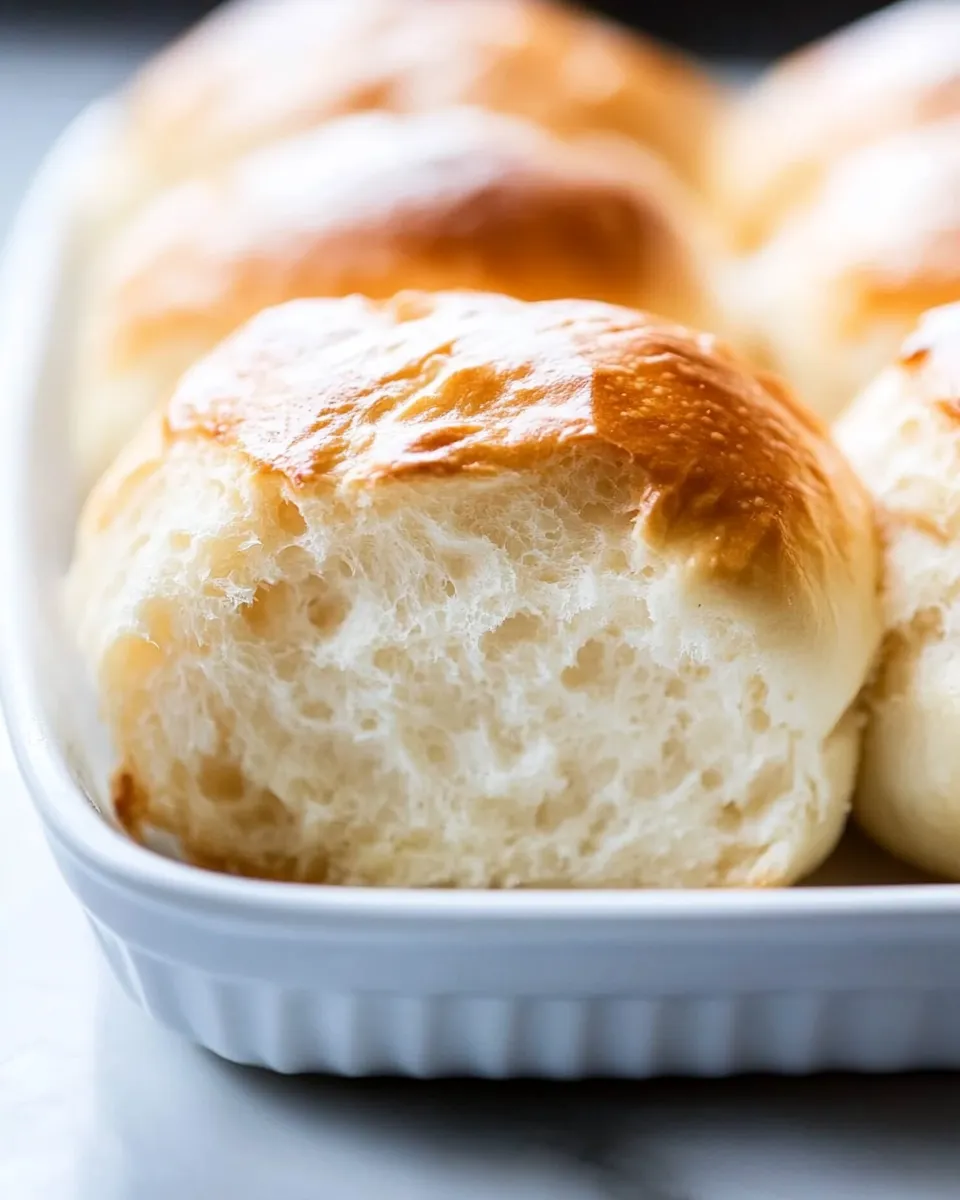
Life-Changing No-Knead Dinner Rolls
These dinner rolls are one of those recipes that quietly become a weekly staple. They’re soft, slightly sweet, and forgiving—no kneading, no fancy equipment, just straightforward steps and reliable results. If you want tender rolls without spending an afternoon working the dough, this is the one to keep in your back pocket.
I test and tweak recipes until they’re practical for home cooks, and this version balances speed and texture: you can make Same Day Rolls or set them for an easy overnight rise. The method is simple, the flavor is rich from butter and honey, and the process is forgiving even if the clock or the kitchen is a little off.
Ingredient Rundown
- 5 tablespoons unsalted butter, divided — melted and used both in the dough for richness and at the end to brush the tops for shine and flavor.
- 3 teaspoons instant yeast — provides the lift. You may substitute active dry yeast but give it a brief proof per note 1 in the directions.
- 3 tablespoons honey, divided — adds gentle sweetness and helps keep the crumb tender.
- 1-1/2 cups water, warm (110°F) — activates the yeast and hydrates the flour; temperature is important for yeast activity.
- 2 large eggs — enrich the dough, improving texture and color.
- 4-1/2 cups all-purpose flour, plus more for shaping rolls — the structure of the rolls; you’ll add extra for dusting and to prevent sticking while shaping.
- 2 teaspoons salt — balances sweetness and strengthens gluten for better structure.
Stepwise Method: Life-Changing No-Knead Dinner Rolls
Prepare ingredients
- Measure all ingredients before you start. Melt 4 tablespoons of the unsalted butter in a microwave-safe bowl and set it aside to cool to room temperature.
- Warm the water to about 110°F. If you don’t have a thermometer, it should feel warm to the touch but not hot.
Activate the yeast
- In a medium bowl, whisk together 3 teaspoons instant yeast, 1 tablespoon of the honey, and the warm 1-1/2 cups water. Let it sit 5 minutes until the mixture looks creamy or foamy. If it does not foam, the yeast may be dead or the water too hot—start over with fresh yeast and correctly warmed water.
Make the enriched butter-egg mixture
- In the bowl with the cooled melted butter, add the remaining 2 tablespoons honey and the 2 large eggs. Whisk until smooth and fully combined.
Form the dough
- In a large bowl, whisk together 4-1/2 cups all-purpose flour and 2 teaspoons salt. Make a well in the center.
- Pour the butter-egg mixture and the yeast mixture into the well. Use a strong rubber spatula to stir until a thick, shaggy dough forms and there are no dry streaks of flour. The dough should be cohesive but somewhat sticky—do not add extra flour beyond what the shaping step calls for.
- Cover the bowl tightly with plastic wrap.
First rise (Same Day or Overnight options)
- Same Day Rolls: Let the dough rise in a draft-free spot at about 70°F for 90–120 minutes, or until it is nearly tripled in size (typically around 90 minutes).
- Overnight Rolls: Let the dough sit at room temperature for 30 minutes, then cover and refrigerate for 8–12 hours. When you’re ready to shape, let the dough stand at room temperature for 30 minutes or until it has tripled in size.
Shape the rolls
- Generously spray a 9×13-inch pan with cooking spray.
- Flour a large, clean work surface and your hands. Dust a spatula with flour and scrape the dough onto the floured surface.
- Gently shape the dough into a rectangular log. Cut the log into 4 equal pieces, then cut each of those pieces into 3 pieces, giving you 12 portions total.
- Dust pieces with flour as needed to prevent sticking. To shape each roll, pull the dough from the top and pinch it underneath, place the pinched side down, and gently roll to form a smooth ball. Arrange the 12 balls into the prepared pan in 4 rows of 3.
- Lightly grease plastic wrap and cover the pan to prevent sticking during the second rise.
Second rise and bake
- Let the rolls rise for 20–30 minutes, up to 45 minutes, until they are nearly doubled in size.
- Preheat your oven to 350°F while the rolls finish rising.
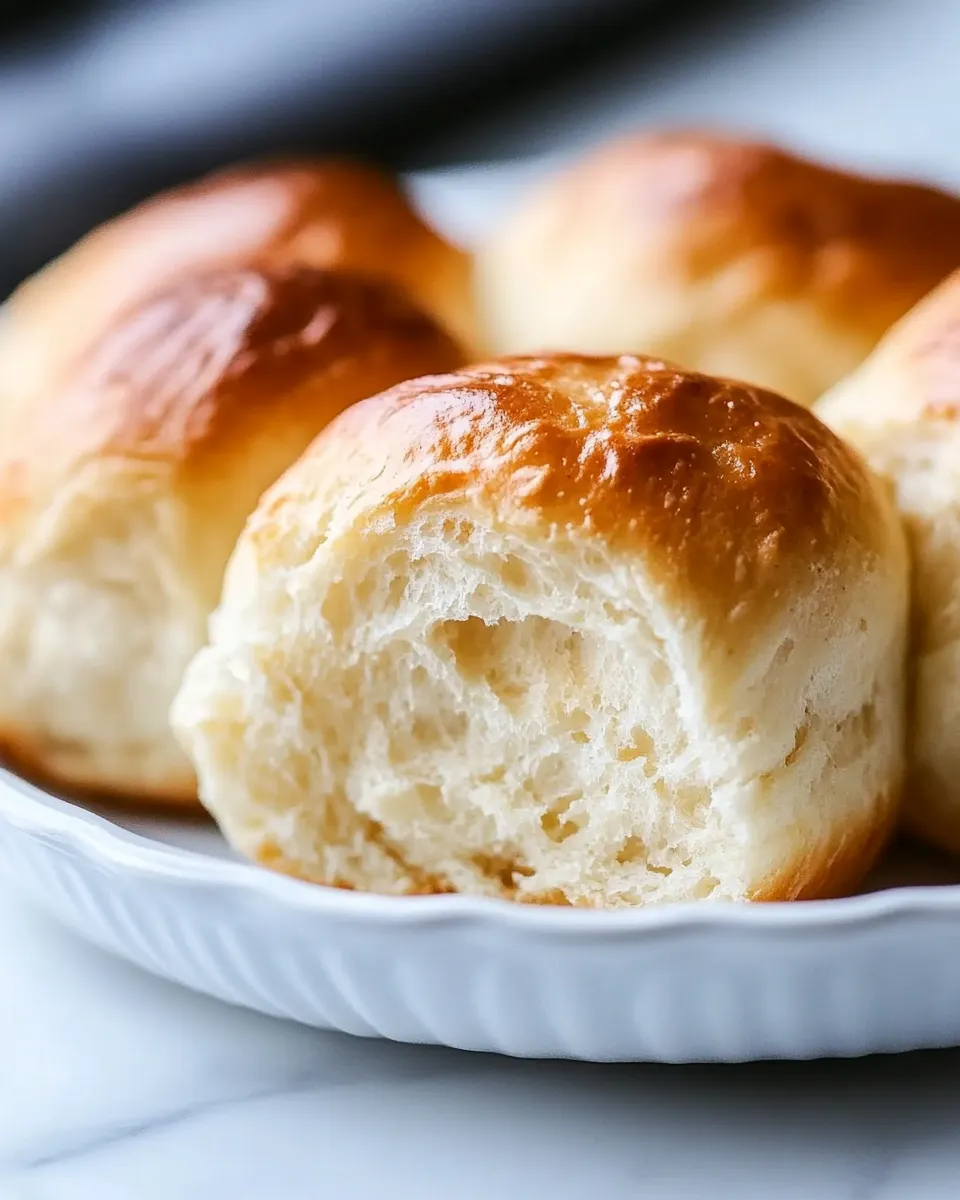
- Remove the plastic wrap and bake the rolls for 45–50 minutes, until they are golden brown and sound hollow when tapped.
- Brush the tops with the remaining 1 tablespoon of butter immediately after they come out of the oven.
- Let the rolls cool slightly before serving—warm is best, but a short rest helps the crumb set.
What Sets This Recipe Apart
- No-knead simplicity: The dough comes together with one mix-and-rest sequence—no hands-on kneading required, which saves time and effort.
- Enriched flavor: Butter, eggs, and honey create a soft, tender crumb with a lightly sweet finish that’s still versatile for savory meals.
- Flexible timing: Same Day or Overnight options let you adapt the schedule to your day—make them fresh or plan ahead for minimal morning effort.
- Reliable structure: The measured amounts and two-rise method produce consistent, even rolls without special tools.
Budget & Availability Swaps
- Butter: Substitute salted butter if that’s all you have—reduce added salt slightly in other savory uses. For a lower-cost option, use an equal amount of margarine, though flavor will differ.
- Yeast: If you have active dry yeast instead of instant, proof it in the warm water and 1 tablespoon honey for 5–10 minutes until foamy, then proceed as directed.
- Honey: Use maple syrup or light corn syrup in a pinch; flavor will change slightly but sweetness and browning remain effective.
- Flour: All-purpose is ideal. If using bread flour, expect slightly chewier rolls; with whole-wheat flour, swap up to 1 cup for a nuttier result and add a little extra water if the dough seems dry.
Tools of the Trade
- 9×13-inch baking pan — fits the 12 rolls in 4 × 3 rows as specified.
- Medium and large mixing bowls — for the yeast and dough stages.
- Rubber spatula — sturdy for mixing shaggy dough.
- Measuring cups and spoons — accurate measurements matter for consistent results.
- Instant-read thermometer (optional) — helps check water temperature for yeast activation.
- Plastic wrap and cooking spray — keep dough moist and prevent sticking.
Problems & Prevention
- Yeast won’t foam: Water was too hot or yeast is inactive. Start over with fresh yeast and ensure water is about 110°F.
- Dough too dry: Mix until there are no dry flour streaks. If it still seems crumbly during shaping, lightly wet your hands and continue shaping rather than adding large amounts of extra flour.
- Dough too sticky to shape: Dust hands and surface with flour, but avoid adding large quantities—excess flour makes dense rolls.
- Dense or under-risen rolls: First rise wasn’t long enough or environment too cold. Give more time in a warmer spot or use the overnight method properly (re-warm to room temp before shaping so it can finish rising).
- Tops burn before centers are done: Tent loosely with foil for the last 10–15 minutes of baking if you find the tops browning too quickly.
Tailor It to Your Diet
- Egg-free: This recipe relies on eggs for richness. For an eggless version, try a tested egg replacer and expect some change in texture—this will require experimentation with liquid adjustments.
- Dairy-free: Substitute melted vegan butter or margarine 1:1. Use a neutral-flavored spread that melts well.
- Lower-sugar: You can reduce honey slightly, but the sweetness contributes to tenderness and browning; expect a firmer crumb if you remove too much.
- Whole-grain: Replace up to 1 cup of the all-purpose flour with whole-wheat and increase water by 1–2 tablespoons if dough feels stiff.
Cook’s Notes
- Room temperature matters: Ingredients (especially eggs and melted butter) work best at similar temperatures to avoid chilling the yeast mixture.
- Shaping tip: For the smoothest tops, create surface tension when you form each ball. A few light rolls on the counter will tighten the skin and help them rise upward instead of spreading.
- Timing: Oven times vary. The rolls are done when golden and hollow-sounding when tapped; if in doubt, test the internal temperature—about 190–200°F is done for enriched rolls.
- Serving: These are delightful plain with butter, or split and used for sliders, sandwiches, or alongside soups and stews.
Storage Pro Tips
- Short-term: Store cooled rolls in an airtight container at room temperature for up to 2 days. Reheat briefly in a low oven or microwave to restore softness.
- Freeze: Wrap cooled rolls individually and freeze for up to 3 months. Reheat from frozen in a 325°F oven for 10–15 minutes, or thaw overnight and warm through.
- Revive stale rolls: Lightly mist with water and heat in a 300°F oven for 8–10 minutes to refresh the crumb.
Common Questions
- Can I use active dry yeast? Yes—proof active dry yeast in the warm water with 1 tablespoon honey for 5–10 minutes until foamy, then continue as written.
- Why two rises? The first rise develops flavor and structure; the second rise gives the shaped rolls lift and an even crumb.
- Can I make smaller or larger rolls? Yes—adjust baking time accordingly. Smaller rolls need less time (watch carefully), larger rolls need more time and may require foil tenting to avoid over-browning.
- My rolls are sticky after baking—why? If underbaked, the centers can be gummy. Ensure they bake 45–50 minutes and sound hollow when tapped.
See You at the Table
These rolls are the kind of recipe you’ll reach for when you want impressively homemade bread without the elbow grease. They come together with pantry ingredients, a little patience, and minimal hands-on time. Make a batch for dinner tonight or prepare the dough the night before for freshly baked rolls in the morning—either way, they’re comforting, dependable, and worth the few steps.
If you try them, tell me how you shaped them, what you served them with, and whether you went Same Day or Overnight—small changes often make big differences, and I love hearing which one becomes your go-to.

Life-Changing No-Knead Dinner Rolls
Ingredients
- 5 tablespoons unsalted butter divided
- 3 teaspoons instant yeast or active dry, see note 1
- 3 tablespoons honey divided
- 1.5 cups water warm (110°F)
- 2 large eggs
- 4.5 cups all-purpose flour plus more for shaping rolls
- 2 teaspoons salt
Instructions
- Melt 4 tablespoons of the butter in a microwave-safe bowl and set aside to cool to room temperature.
- In a medium bowl, whisk together the yeast, 1 tablespoon honey, and warm water (about 110°F). Let sit 5 minutes until foamy; if it does not foam, the yeast may be inactive.
- To the cooled melted butter, add the remaining 2 tablespoons honey and the eggs; whisk until smooth.
- In a large bowl, whisk together the flour and salt. Make a well in the center and pour in the butter-egg mixture and the yeast mixture. Stir with a sturdy spatula until a thick, shaggy dough forms with no dry streaks.
- Cover the bowl with plastic wrap. For same-day rolls, let the dough rise in a draft-free place (about 70°F) for 90–120 minutes until nearly tripled. For overnight rolls, let rise 30 minutes, refrigerate 8–12 hours, then bring to room temperature and wait until tripled (about 30 minutes).
- Generously spray a 9×13-inch pan with cooking spray. Flour a work surface and your hands. Turn the dough onto the floured surface, shape it into a rectangular log, and cut into 12 equal pieces (cut into 4, then each into 3).
- Dust pieces with flour as needed. Shape each piece into a smooth ball by pulling the dough toward the bottom and pinching underneath, then roll gently to smooth. Place the balls pinched-side down into the prepared pan in 4 rows of 3. Cover with lightly greased plastic wrap.
- Let the rolls rise for 20–30 minutes (up to 45 minutes) until nearly doubled in size.
- Preheat the oven to 350°F. Remove the plastic wrap and bake the rolls for 45–50 minutes until golden brown and hollow-sounding when tapped.
- Brush the tops with the remaining 1 tablespoon of butter and let the rolls cool slightly before serving.
Equipment
- 9x13 inch Baking Pan
- Microwave-safe Bowl
- medium bowl
- Large Bowl
- rubber spatula
- Plastic Wrap
- Measuring cups and spoons
- clean work surface
Notes
- Instant yeast is recommended; active dry yeast will work but may require longer rise times.
- Test water temperature on your wrist; it should feel warm, not hot.
- Let chilled dough come to room temperature before shaping for best rise.
- Use additional flour sparingly while shaping to prevent dry rolls.
- Brush with butter immediately after baking for a soft, shiny crust.