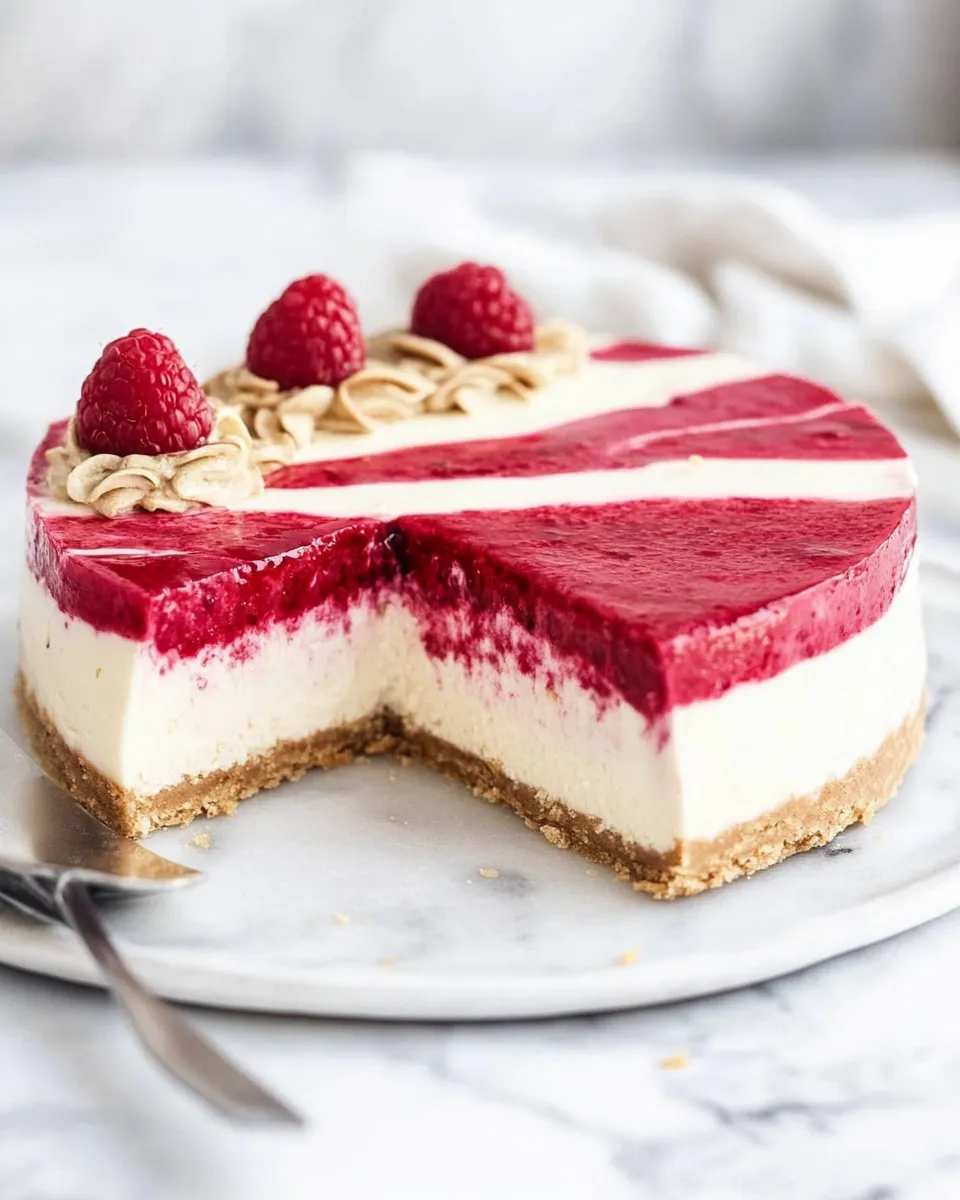
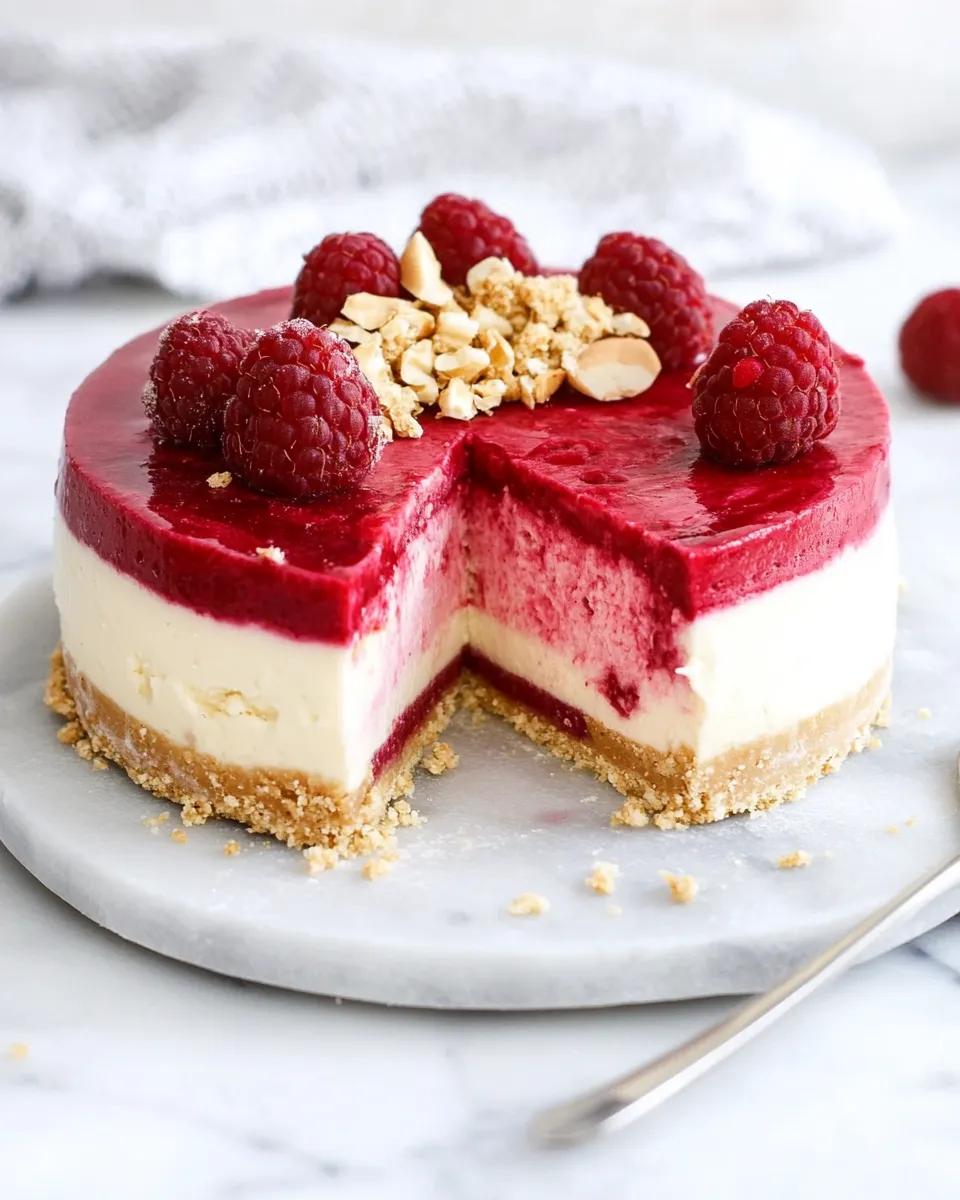
Raspberry Vegan Cheesecake
This raspberry vegan cheesecake is a refreshing, surprisingly rich dessert that travels well from freezer to table. It balances a nutty, date-sweetened crust with a creamy cashew-and-cream-cheese middle and a bright chia-studded raspberry topping. No baking required, and the layers hold up beautifully for serving and storing.
Throughout the recipe you’ll find practical tips to keep textures perfect: soak the cashews, press the crust firmly, and give thawing times the respect they deserve. I test this version often because it’s reliably crowd-pleasing and makes a lovely centerpiece for gatherings or a quiet weekend dessert.
Prep time includes soaking; active hands-on time is modest. Read the ingredient notes and step-by-step instructions carefully so each layer sets as intended. Ready? Let’s go layer by layer.
Ingredient Breakdown
- 1 cup walnuts — provides the crunchy, nutty base for the crust; pulse until crumbly.
- 3 soft Medjool dates, pitted — natural sweetener and binder for the crust; use fresh, pliable dates.
- ½ tablespoon coconut oil — helps the crust hold together once chilled.
- Heaping ¼ teaspoon sea salt — balances sweetness and rounds out flavor in the crust.
- 1½ cups raw cashews, soaked 4 hours, then drained — the primary body of the cheesecake layer; soaking softens them so they blend silky.
- ½ cup full-fat coconut milk — adds richness to the cashew filling; make sure it’s well-shaken so the cream is incorporated.
- ¼ cup plus 2 tablespoons maple syrup — sweetens the cashew filling; measure both portions together when assembling the layer.
- ¼ cup fresh lemon juice — brightens and tangs the cashew filling; use fresh for best flavor.
- 1 tablespoon lemon zest — concentrated lemon flavor for the filling; zest before juicing the lemon.
- 2 teaspoons pure vanilla extract — rounds and deepens the filling’s flavor profile.
- ½ teaspoon sea salt — enhances the filling’s sweet-and-tart balance.
- 1 (8-ounce) package plain vegan cream cheese — adds richness and familiar cheesecake texture to the middle layer; use room temperature for easier blending.
- ½ cup full-fat coconut milk — an additional portion for the cream cheese layer to ensure smoothness.
- ¼ cup maple syrup — sweetener for the cream cheese layer; provides mild caramel notes.
- ¼ cup fresh lemon juice — provides acidity to the cream cheese layer so it tastes bright and less cloying.
- 1 teaspoon pure vanilla extract — flavor support in the cream cheese layer.
- 1 (12-ounce) bag frozen raspberries, mostly thawed — the vibrant topping; thaw enough to blend smoothly but keep cool.
- ½ teaspoon fresh lemon juice — a touch more acidity for the raspberry topping to lift the fruit flavor.
- 2 tablespoons maple syrup — sweetens the raspberry layer; adjust slightly if berries are very tart.
- 2 tablespoons chia seeds — thickens the raspberry topping and adds a pleasant gelatinous texture when set.
Raspberry Vegan Cheesecake: From Prep to Plate
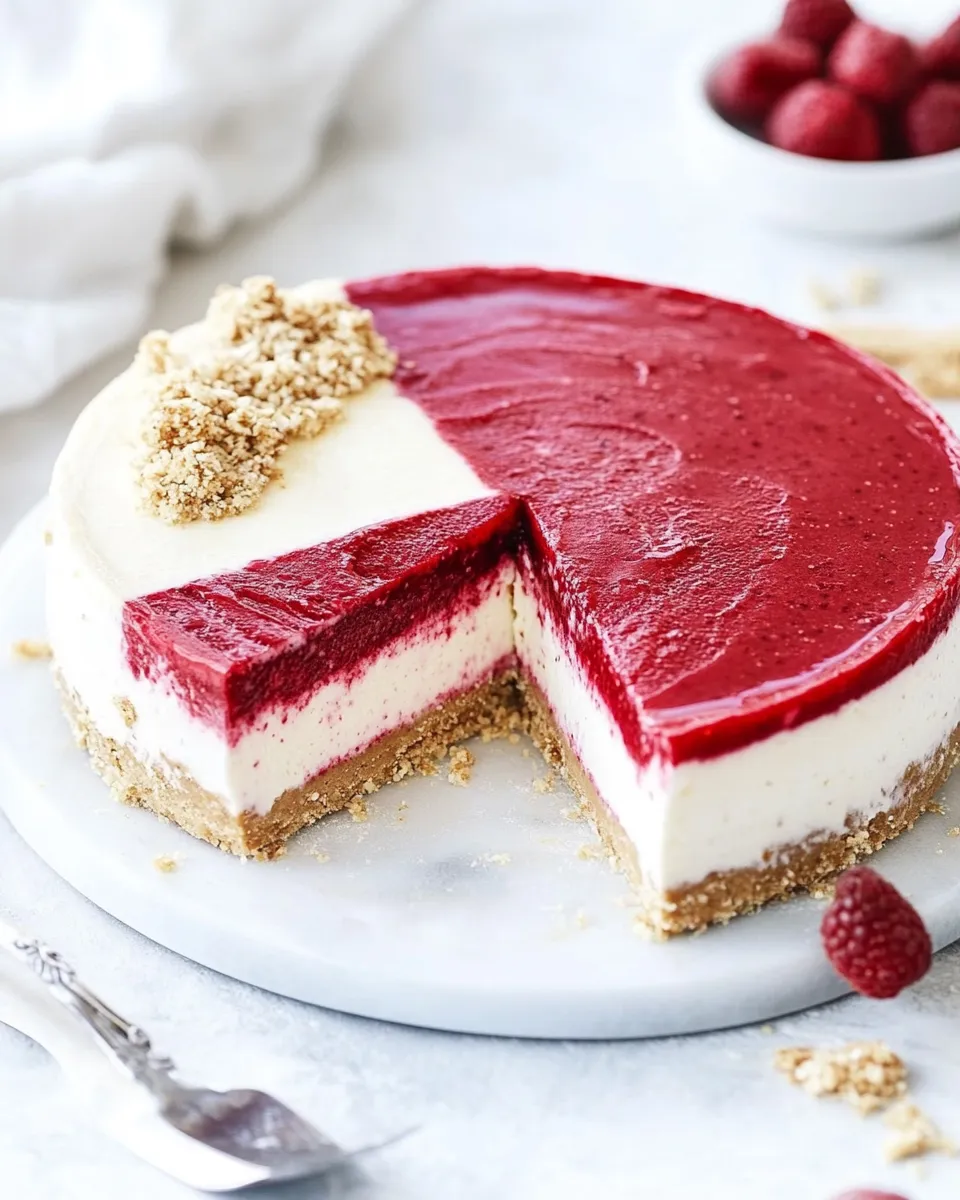
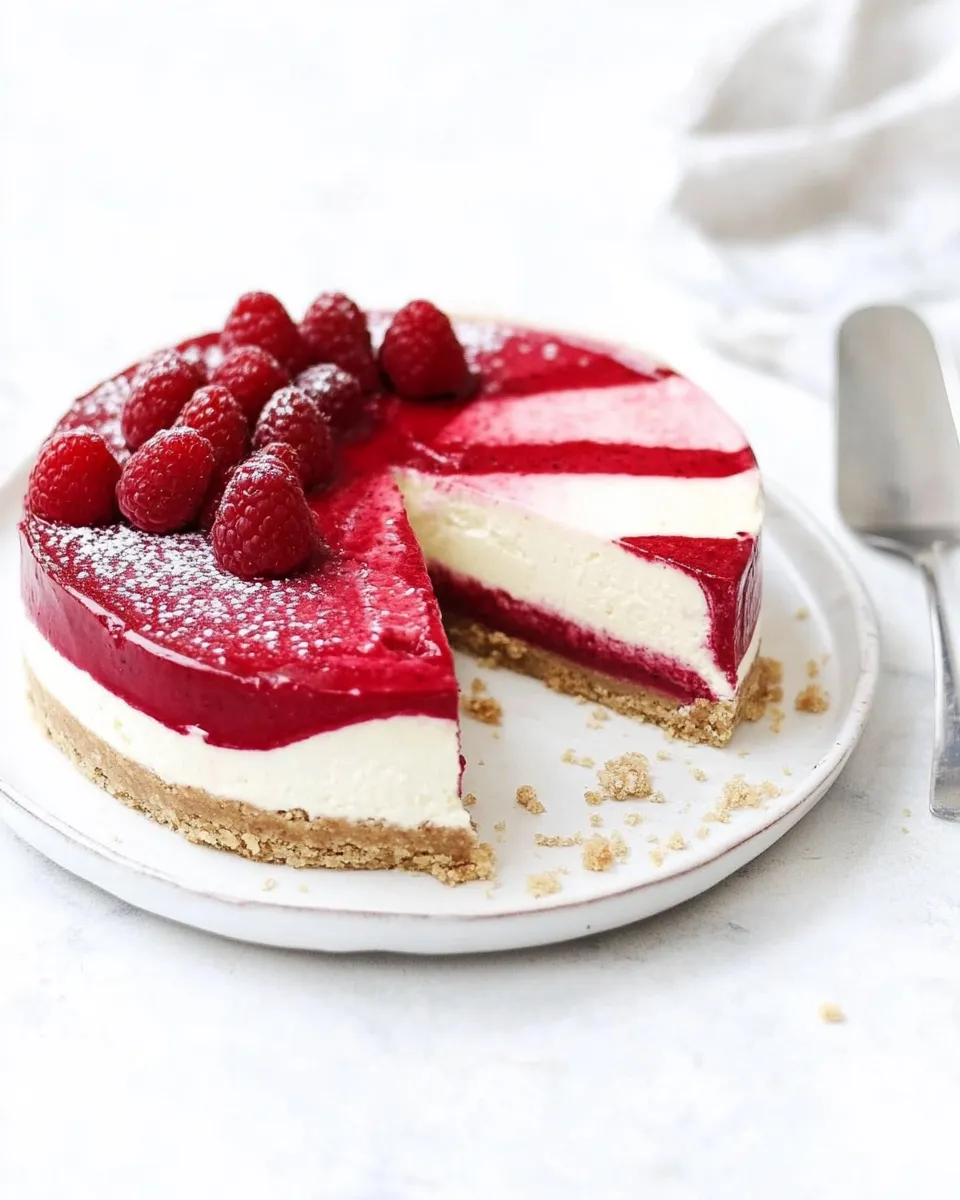
- Prep your pan and ingredients. Line an 8 x 4-inch loaf pan with parchment paper, leaving about 1 inch of overhang on each side for easy removal. Drain the cashews after soaking for 4 hours. Thaw the frozen raspberries until mostly softened but still cool.
- Make the crust. In a food processor, pulse 1 cup walnuts, 3 pitted Medjool dates, ½ tablespoon coconut oil, and a heaping ¼ teaspoon sea salt until the mixture is crumbly and holds together when pressed. Press the crust mixture evenly into the bottom of the prepared loaf pan. Place the pan in the freezer for at least 15 minutes while you make the cheesecake layer.
- Blend the cheesecake layer. In a high-powered blender, combine the soaked and drained 1½ cups raw cashews, ½ cup full-fat coconut milk, ¼ cup plus 2 tablespoons maple syrup, ¼ cup fresh lemon juice, 1 tablespoon lemon zest, 2 teaspoons pure vanilla extract, and ½ teaspoon sea salt. Blend until completely creamy—about 1 minute with a high-powered machine. Stop and scrape the sides if needed to ensure no graininess remains.
- Assemble and freeze the cheesecake layer. Pour the cashew mixture over the chilled crust and smooth the surface with an offset spatula or the back of a spoon. Return the pan to the freezer and let this layer firm up completely, at least 2 hours.
- Make the raspberry topping. In the blender, combine the mostly thawed 12-ounce bag of frozen raspberries, ½ teaspoon fresh lemon juice, 2 tablespoons maple syrup, and 2 tablespoons chia seeds. Blend until smooth, then let the mixture sit for a few minutes so the chia seeds begin to thicken.
- Top and freeze. Pour the raspberry-chia mixture over the fully set cheesecake layer and smooth it into an even layer. Freeze the assembled cake for 4 hours or overnight so the raspberry layer sets well.
- Serve. When ready to serve, remove the loaf pan from the freezer and let it sit at room temperature for at least 20 minutes. Use the parchment overhang to lift the cheesecake from the pan. Use a sharp chef’s knife to slice into 8 to 10 pieces—wipe the knife between cuts for clean slices. Let individual slices sit at room temperature for an additional 15 to 20 minutes, until the middle layer becomes creamy and the raspberry layer softens slightly. Re-freeze any leftover slices.
Why Cooks Rave About It
- Layers with purpose: crunchy, creamy, and fruity layers each deliver a distinct texture without complicated techniques.
- Reliable make-ahead dessert: freezes solid and thaws predictably, so you can prepare it well before guests arrive.
- Plant-based richness: cashews and vegan cream cheese recreate the classic cheesecake mouthfeel without dairy.
- Bright, fresh flavors: lemon juice and zest cut through the richness so the cake never feels heavy.
Texture-Safe Substitutions
- If cashews are unavailable — try 1½ cups blanched, soaked almonds (note: slightly more gritty texture). Soaking is still required.
- If you don’t have vegan cream cheese — add an extra ½ cup blended cashews and increase maple syrup by 1 tablespoon for sweetness, but expect a less tangy result.
- For a nuttier crust — replace walnuts with pecans, same quantity.
- If you need a nut-free crust — substitute the walnuts with 1 cup sunflower seeds and proceed the same way (may taste earthier).
- If the coconut milk is too thin — use the thick coconut cream portion for a firmer filling texture.
What’s in the Gear List
- Food processor — for pulsing the crust ingredients evenly.
- High-powered blender — essential for a silky cashew filling; a regular blender can work but blend longer and check texture.
- 8 x 4-inch loaf pan — gives the cake its neat, sliceable shape.
- Parchment paper — makes unmolding effortless.
- Offset spatula or spoon — for smoothing layers cleanly.
- Sharp chef’s knife — for clean slices; keep it warm/clean between cuts for best results.
What Not to Do
- Don’t skip soaking the cashews — unsoaked cashews will leave a grainy texture and the filling won’t become silky.
- Don’t rush freezing times — the layers need full set times listed; cutting early yields slushy or collapsing slices.
- Don’t over-blend frozen raspberries with chia — blend until smooth, then let the chia thicken; over-blending can break down the seeds too much.
- Don’t try to slice the fully frozen cake — let it thaw 20–35 minutes for clean slices; otherwise the knife will slip and textures won’t be right.
Season-by-Season Upgrades
- Spring — swap half the raspberries for fresh strawberries when in season for a brighter, sweeter topping.
- Summer — add thinly sliced berries on top after thawing for a fresh garnish and extra fruit texture.
- Autumn — fold 1 teaspoon ground cinnamon into the crust for warm spice notes that pair with walnuts.
- Winter — drizzle a bit of warmed cherry compote over each slice to add contrast and festive color.
Recipe Notes & Chef’s Commentary
Measurements and ingredient names in this recipe are intentional; follow them for consistent results. The recipe uses two portions of full-fat coconut milk—one in the cashew blend and another in the cream cheese layer—to ensure both layers have the right richness and mouthfeel.
When blending the cashew mixture, aim for a completely smooth texture. If you hear the blender struggling, pause and scrape down the sides; add a splash of coconut milk only if absolutely necessary to maintain the stated ½ cup amount. The vegan cream cheese layer uses a full 8-ounce package—keep it at room temperature so it blends smoothly into the coconut milk and maple syrup.
Leftovers & Meal Prep
- Storage: Wrap the whole cake or individual slices in plastic wrap or place in an airtight container and freeze for up to 2 months.
- Thawing: Move frozen slices to the refrigerator for several hours or let sit at room temperature for 20–30 minutes before serving.
- Reheating: Do not attempt to microwave—this dessert is best enjoyed chilled or at slightly softened room temperature.
Your Questions, Answered
- Q: Can I substitute another sweetener for maple syrup? — A: Yes; use an equal amount of agave or a neutral liquid sweetener, but flavor will change subtly.
- Q: Do the chia seeds make the raspberry layer gelatinous? — A: Yes. The chia seeds thicken as they absorb liquid, creating a set but spoonable topping.
- Q: Is it safe to use a regular blender? — A: Yes. A regular blender will work; just blend longer and check for creaminess. High-powered blenders get silkier results faster.
See You at the Table
This Raspberry Vegan Cheesecake is a dependable dessert—bright, elegant, and forgiving when you follow the set times and blending notes. Make it ahead for holiday meals or for a week of ready-to-serve slices. If you try a seasonal tweak, I’d love to hear which version became your favorite. Enjoy the layers and the smiles that follow.
Raspberry Vegan Cheesecake
Ingredients
- 1 cup walnuts
- 3 soft Medjool dates pitted
- 1/2 tablespoon coconut oil
- heaping 1/4 teaspoon sea salt
- 1 1/2 cups raw cashews soaked 4 hours, then drained
- 1/2 cup full-fat coconut milk
- 1/4 cup maple syrup plus 2 tablespoons (see cheesecake layer and filling amounts combined)
- 1/4 cup fresh lemon juice
- 1 tablespoon lemon zest
- 2 teaspoons pure vanilla extract
- 1/2 teaspoon sea salt
- 8 ounces plain vegan cream cheese 1 (8-ounce) package
- 1/2 cup full-fat coconut milk for cheesecake layer
- 1/4 cup maple syrup for cheesecake layer
- 1/4 cup fresh lemon juice for cheesecake layer
- 1 teaspoon pure vanilla extract for cheesecake layer
- 12 ounces frozen raspberries mostly thawed
- 1/2 teaspoon fresh lemon juice for raspberry layer
- 2 tablespoons maple syrup for raspberry layer
- 2 tablespoons chia seeds
Instructions
- Make the crust: Pulse the walnuts, pitted dates, 1/2 tablespoon coconut oil, and a heaping 1/4 teaspoon sea salt in a food processor until the mixture is coarse and holds together when pressed.
- Line an 8 x 4-inch loaf pan with parchment paper leaving about 1 inch overhang on two sides, then press the crust mixture firmly into the bottom of the pan and freeze for at least 15 minutes.
- Make the cashew cheesecake layer: Drain the soaked cashews and add them to a high-powered blender with 1/2 cup coconut milk, 1/4 cup maple syrup, 1/4 cup fresh lemon juice, 1 tablespoon lemon zest, 2 teaspoons vanilla, and 1/2 teaspoon sea salt.
- Blend until completely smooth and creamy, about 1 minute, scraping down the sides as needed.
- Pour the cashew filling over the chilled crust and smooth the top; freeze until the layer is completely firm, at least 2 hours.
- Make the raspberry layer: In a blender, combine the mostly thawed raspberries, 1/2 teaspoon lemon juice, 2 tablespoons maple syrup, and 2 tablespoons chia seeds, then blend until smooth.
- Pour the raspberry purée over the frozen cheesecake layer and spread evenly, then return to the freezer for 4 hours or overnight until fully set.
- To serve: Remove the cheesecake from the freezer and let thaw at room temperature at least 20 minutes. Lift it from the pan using the parchment overhang, slice into 8 to 10 pieces with a sharp knife, and let individual slices sit 15–20 minutes to reach a creamy consistency before serving.
Equipment
- food processor or blender
- high-powered blender
- 8 x 4-inch loaf pan
- Parchment Paper
- Measuring cups and spoons
- Spatula
Notes
- A high-powered blender such as a Vitamix is recommended for a very creamy cashew layer.
- Soak cashews for about 4 hours for best texture.
- Press crust firmly to prevent crumbling when slicing.
- Let slices thaw briefly before serving for the best texture.