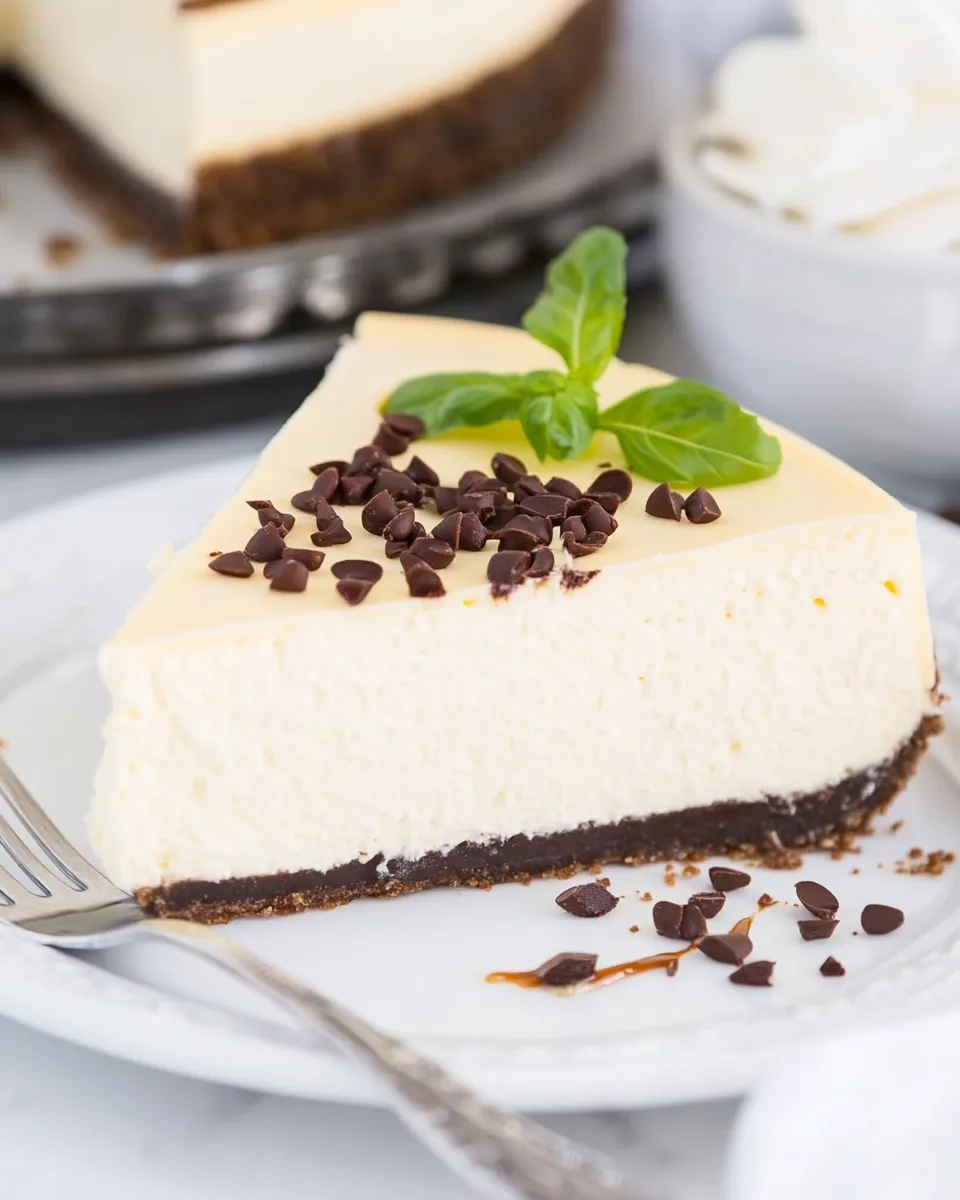
Easy Blender-Batter Self-Crusting Cheesecake
This cheesecake is the kind of recipe I reach for when I want something impressive without a lot of fuss. The batter comes together in a blender, the crust forms itself as it bakes, and the final result is a tall, slightly rustic cheesecake with a soft center and raised edges that hold a simple sour cream glaze. It’s homey, forgiving, and fast enough to make on a weeknight yet pretty enough for guests.
No crust to press, no water baths, no complicated folding—just a handful of pantry staples and two cans of cream cheese. The blender does the heavy lifting: it aerates the batter so the cake puffs up in the oven and creates its own tender rim. Read through the notes and tips before you start; the few small precautions here will help you avoid overflow and ensure an even bake.
Ingredient Rundown
- 2 large eggs — provide structure and help the cheesecake set while contributing to the batter’s rise.
- 1 cup granulated sugar — sweetens and tenderizes the batter; split-sugar control isn’t needed here.
- ¾ cup milk or half-and-half — thins the batter for blending and adds moisture; half-and-half yields a richer texture.
- ½ cup Original Bisquick™ mix — the self-crusting magic: it thickens the batter and creates the raised edge as it bakes.
- 2 teaspoons vanilla extract — flavor backbone for the cheesecake batter.
- two 8-ounce packages cream cheese, softened — the main creamy element; soften well and dice if your blender isn’t powerful so it blends smoothly.
- ¾ cup sour cream or Greek yogurt — forms the glossy, tangy glaze that smooths the top and balances sweetness.
- ¼ cup granulated sugar — sweetens the sour cream glaze without overpowering tang.
- ½ teaspoon vanilla extract — adds depth and ties the glaze flavor to the cheesecake.
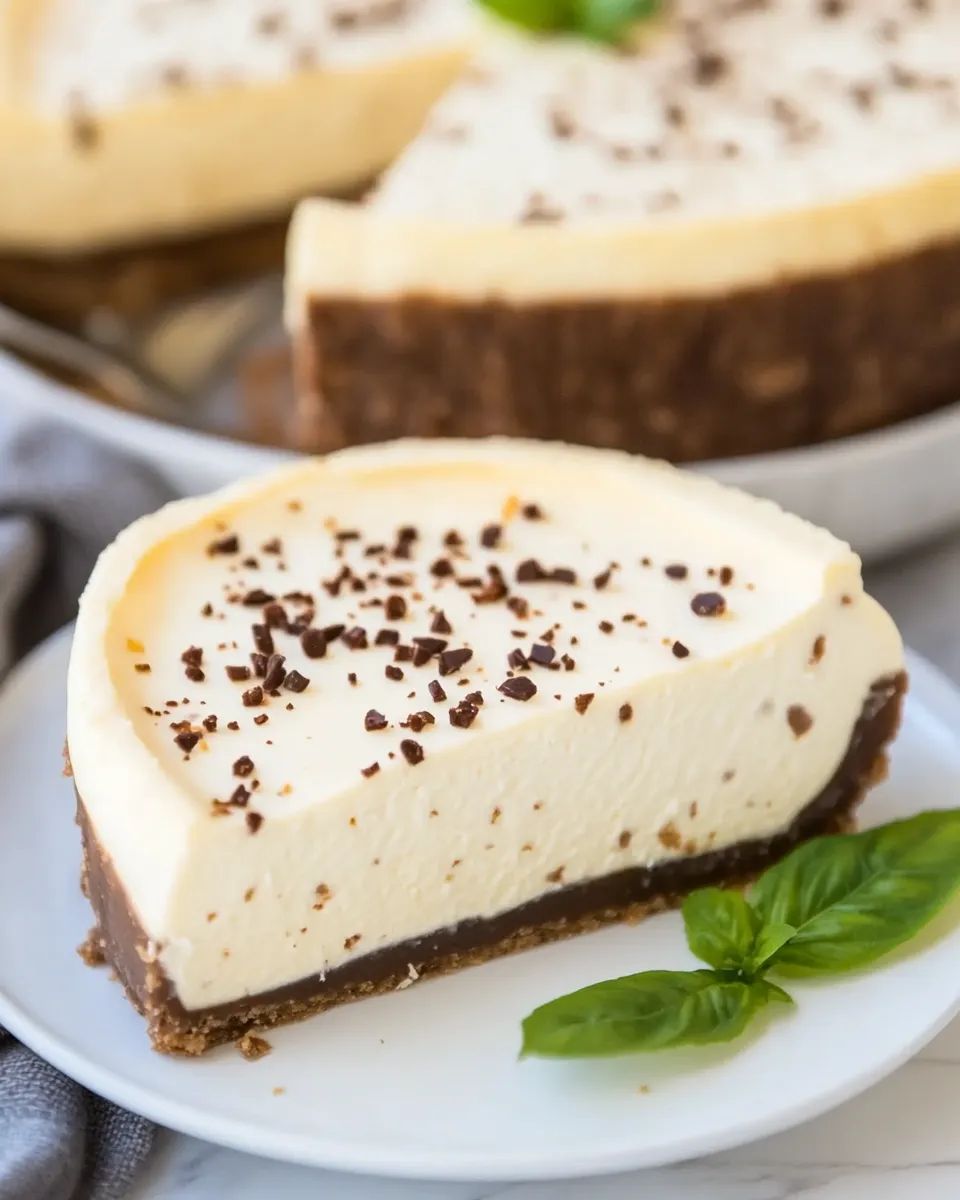
- about 1 ounce dark chocolate, chopped — a final garnish for contrast; use a grater or chop finely and sprinkle evenly.
Blender-Batter Self-Crusting Cheesecake Made Stepwise
- Preheat the oven to 350°F (175°C). Generously spray a 9-inch round pie dish that is at least 2 inches deep with cooking spray. Using a shallow or smaller (8-inch) dish can cause overflow because this cheesecake rises significantly.
- Place the eggs, 1 cup granulated sugar, ¾ cup milk or half-and-half, ½ cup Original Bisquick™ mix, and 2 teaspoons vanilla extract in the blender jar. Blend on high until the mixture is smooth and uniform, about 15 to 30 seconds. Scrape down the sides if needed.
- Add the softened cream cheese (both 8-ounce packages). If your blender is not very powerful, dice the cream cheese into smaller chunks before adding. Blend on high until the batter is completely smooth, about 1 to 2 minutes depending on blender strength.
- Pour the finished batter into the prepared pie dish. Place the pie dish on a baking sheet to catch any overflow as a precaution.
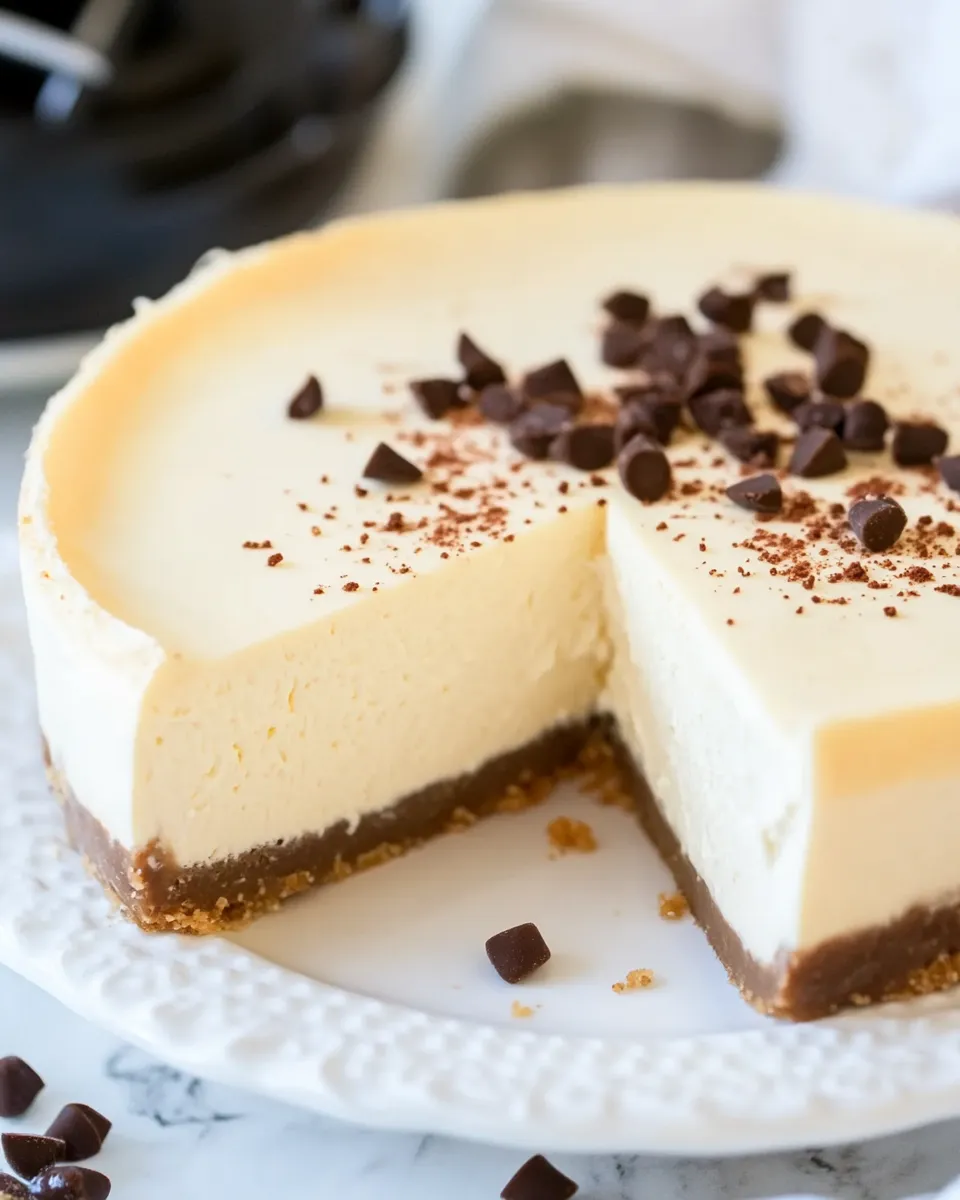
- Bake in the preheated oven for 40 to 45 minutes. Start checking at 40 minutes: a knife or toothpick inserted into the center should come out clean or with a few moist crumbs but no raw batter. The cheesecake will puff up in the oven; it will firm as it cools and typically falls slightly in the center while the edges remain raised.
- Remove the cheesecake from the oven and transfer it to a wire rack. Allow it to cool completely before adding the glaze; this helps the glaze sit smoothly and prevents sliding.
- While the cheesecake cools, whisk together the glaze: in a medium bowl combine ¾ cup sour cream or Greek yogurt, ¼ cup granulated sugar, and ½ teaspoon vanilla extract. Whisk until smooth and no sugar grains remain.
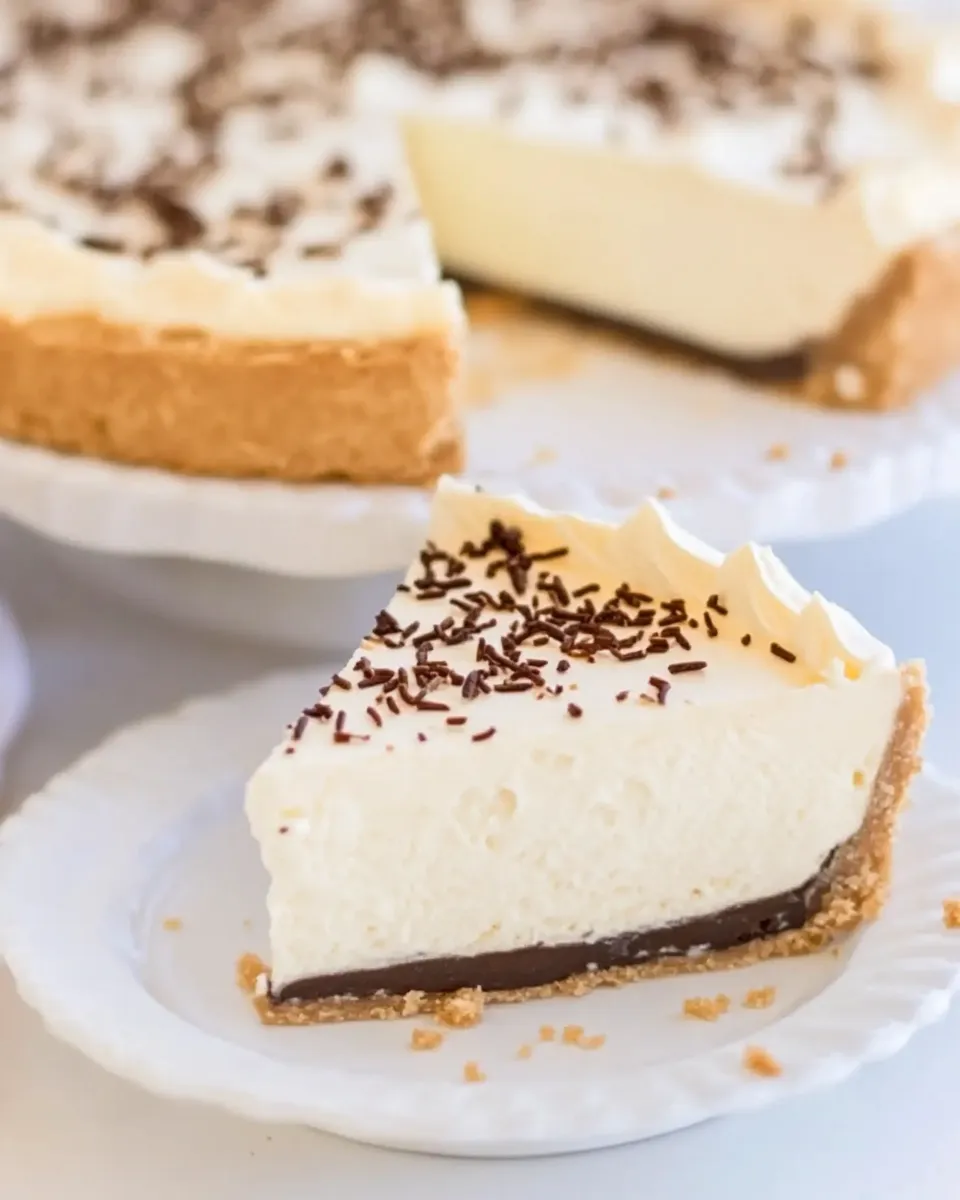
- Once the cheesecake is completely cool, pour the glaze evenly over the center portion of the cake. Avoid spreading the glaze over the raised crust edges; keep it toward the center so the contrast between crust and filling remains visible.
- Evenly sprinkle about 1 ounce chopped dark chocolate over the glazed center. Slice and serve, or cover loosely with plastic wrap and refrigerate until ready to serve.
Why Cooks Rave About It
This recipe earns fans because it collapses several labor-intensive steps into one: blending instead of whipping and a self-forming crust instead of pressing crumbs. The texture is reliably creamy with a tender, bouncy structure thanks to the eggs and Bisquick. It’s forgiving—minor cracks or a slight fall in the center won’t ruin the dessert because the glaze and chocolate cover it.
It’s also accessible: no special cheesecake pans, no tricky water baths, and minimal cleanup. The blender does most of the work, so beginners can get consistent results. Experienced bakers appreciate the speed and the versatility; this base adapts well to different toppings and flavor swaps.
Flavor-Forward Alternatives
- Berry Swirl: Warm ½ cup mixed berries with 1–2 tablespoons sugar until saucy, cool slightly, then drop spoonfuls on the batter before baking and swirl lightly.
- Lemon Brightness: Add 1 tablespoon lemon zest to the batter and replace 2 tablespoons of milk with fresh lemon juice for a brighter profile; finish with a thin lemon glaze instead of sour cream.
- Espresso Touch: Dissolve 1–2 teaspoons instant espresso in the ¾ cup milk before blending for a subtle coffee note. Top with shaved dark chocolate.
- Nutty Crunch: Sprinkle ¼ cup chopped toasted pecans or almonds over the glaze before the chocolate for texture.
Equipment Breakdown
- Blender: High-speed preferred for a perfectly smooth batter; if using a low-power blender, dice the cream cheese small and blend in batches.
- 9-inch round pie dish (≥2 inches deep): Essential size; a shallower dish risks overflow as the cheesecake rises.
- Baking sheet: Catches drips if the batter puffs over—simple insurance.
- Wire rack: For even cooling before glazing.
- Mixing bowl & whisk: For the sour cream glaze.
- Knife or toothpick: To test doneness in the center.
Mistakes Even Pros Make
- Using an 8-inch or shallow dish—this cheesecake expands and overflows easily; stick to a 9-inch dish at least 2 inches deep.
- Trying to glaze while the cake is still warm—glaze can slide off or become too thin; wait until completely cool.
- Not softening the cream cheese—cold chunks will lead to streaks and uneven texture; dice if necessary for weaker blenders.
- Removing before it’s set—if a toothpick shows raw batter, it won’t firm properly after cooling; always check for a few moist crumbs, not wet batter.
Seasonal Flavor Boosts
- Spring: Top with macerated strawberries and a few fresh mint leaves for brightness.
- Summer: Spoon on a mixed berry coulis and scatter basil for a fragrant twist.
- Autumn: Stir 1 teaspoon ground cinnamon and ¼ teaspoon nutmeg into the batter; finish with a caramel drizzle.
- Winter: Fold 2 tablespoons unsweetened cocoa into the batter for a chocolate version and dust with powdered sugar.
Pro Tips & Notes
Before you start
- Bring eggs and cream cheese to room temperature for better blending and a smoother batter.
- Measure Bisquick by spooning it into the cup and leveling—avoid compacting for accurate texture.
Baking tips
- Place the pie dish on a rimmed baking sheet to catch overflow—simple step that keeps your oven clean.
- If the edges brown too quickly, tent loosely with foil for the last 10 minutes of baking while the center finishes.
Storage
- Cover and refrigerate for up to 4 days. For best texture, slice with a warm, dry knife to get clean cuts.
Save It for Later
Bookmark this page or print the recipe card and store it with your go-to desserts. The method is a great template for experimentation: swap extracts, add zests or spices, and try different toppings. If you like to meal-plan, this cheesecake holds well in the fridge and is easy to make a day ahead—glaze and garnish the morning you serve for the freshest appearance.
Common Questions
- Can I use low-fat cream cheese? Yes—lite cream cheese works, but expect a slightly less rich texture. Dice it if your blender is weak.
- Do I need a water bath? No. This recipe is designed to be baked without a water bath; the blender aeration and Bisquick produce a reliable set.
- Why did my cheesecake crack? A slight crack is normal here and won’t affect flavor; cool completely and cover with the sour cream glaze to hide imperfections.
- Can I make this gluten-free? Not with Original Bisquick™. You could try a certified gluten-free baking mix with similar leavening and flour composition, but results may vary.
Bring It to the Table
Serve chilled or at cool room temperature. A simple slice with a dusting of powdered sugar and extra shaved chocolate looks elegant. Pair with black coffee or a slightly sweet dessert wine to balance the creaminess. Whether you’re feeding family after dinner or bringing a dessert to a potluck, this blender-batter self-crusting cheesecake delivers a creamy, crowd-pleasing finish with minimal effort.
Easy Blender-Batter Self-Crusting Cheesecake
Ingredients
- 2 large eggs
- 1 cup granulated sugar
- 3/4 cup milk or half-and-half
- 1/2 cup Original Bisquick mix
- 2 teaspoons vanilla extract
- 16 ounces cream cheese two 8-ounce packages, softened and cut into chunks
- 3/4 cup sour cream or Greek yogurt lite is okay
- 1/4 cup granulated sugar for the glaze
- 1/2 teaspoon vanilla extract for the glaze
- 1 ounce dark chocolate about, chopped for sprinkling
Instructions
- Preheat the oven to 350°F (175°C). Thoroughly spray a 9-inch round pie dish (at least 2 inches deep) with cooking spray and set it on a baking sheet.
- Add the 2 eggs, 1 cup granulated sugar, 3/4 cup milk or half-and-half, 1/2 cup Bisquick mix, and 2 teaspoons vanilla extract to the blender. Blend on high until smooth, about 15–30 seconds.
- Add the softened cream cheese (cut into chunks) to the blender and blend on high until the batter is completely smooth, about 1–2 minutes depending on blender power.
- Pour the batter into the prepared pie dish placed on the baking sheet and bake for 40–45 minutes, or until a knife or toothpick inserted in the center comes out clean or with a few moist crumbs but no liquid batter.
- Remove the cheesecake from the oven and place it on a wire rack to cool completely; it will firm up and may fall slightly in the center.
- In a medium bowl, whisk together 3/4 cup sour cream or Greek yogurt, 1/4 cup granulated sugar, and 1/2 teaspoon vanilla extract until smooth to make the glaze.
- Evenly pour the glaze over the cooled cheesecake, keeping it toward the center and away from the raised crust edges. Sprinkle the chopped dark chocolate over the top.
- Slice and serve, or cover with plastic wrap and refrigerate until ready to serve.
Equipment
- 9-inch (2-inch deep) round pie dish
- Blender
- Baking Sheet
- Wire Rack
- medium bowl
- Whisk
Notes
- Cheesecake will keep airtight in the fridge for up to 5 days.
- Recipe adapted from Betty Crocker.