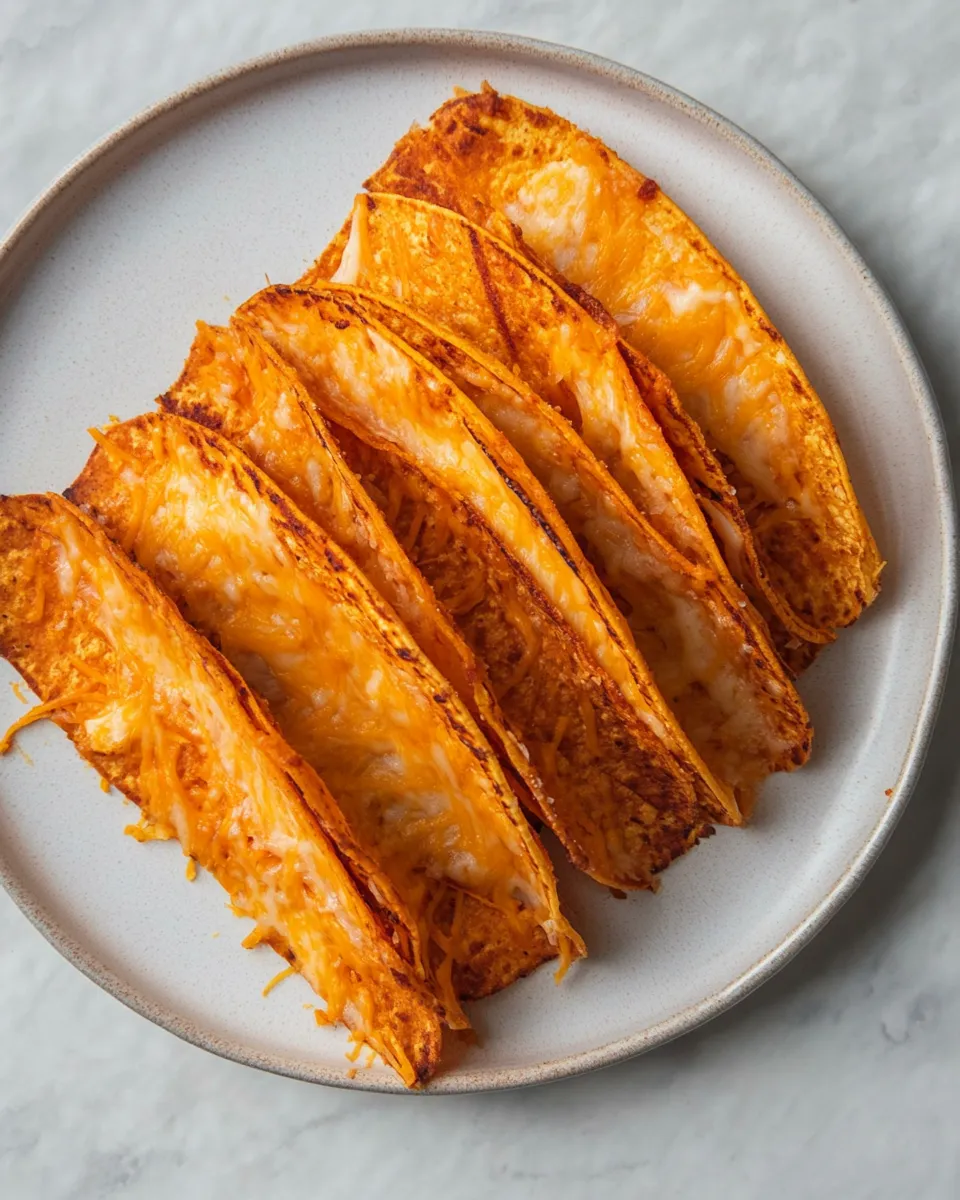
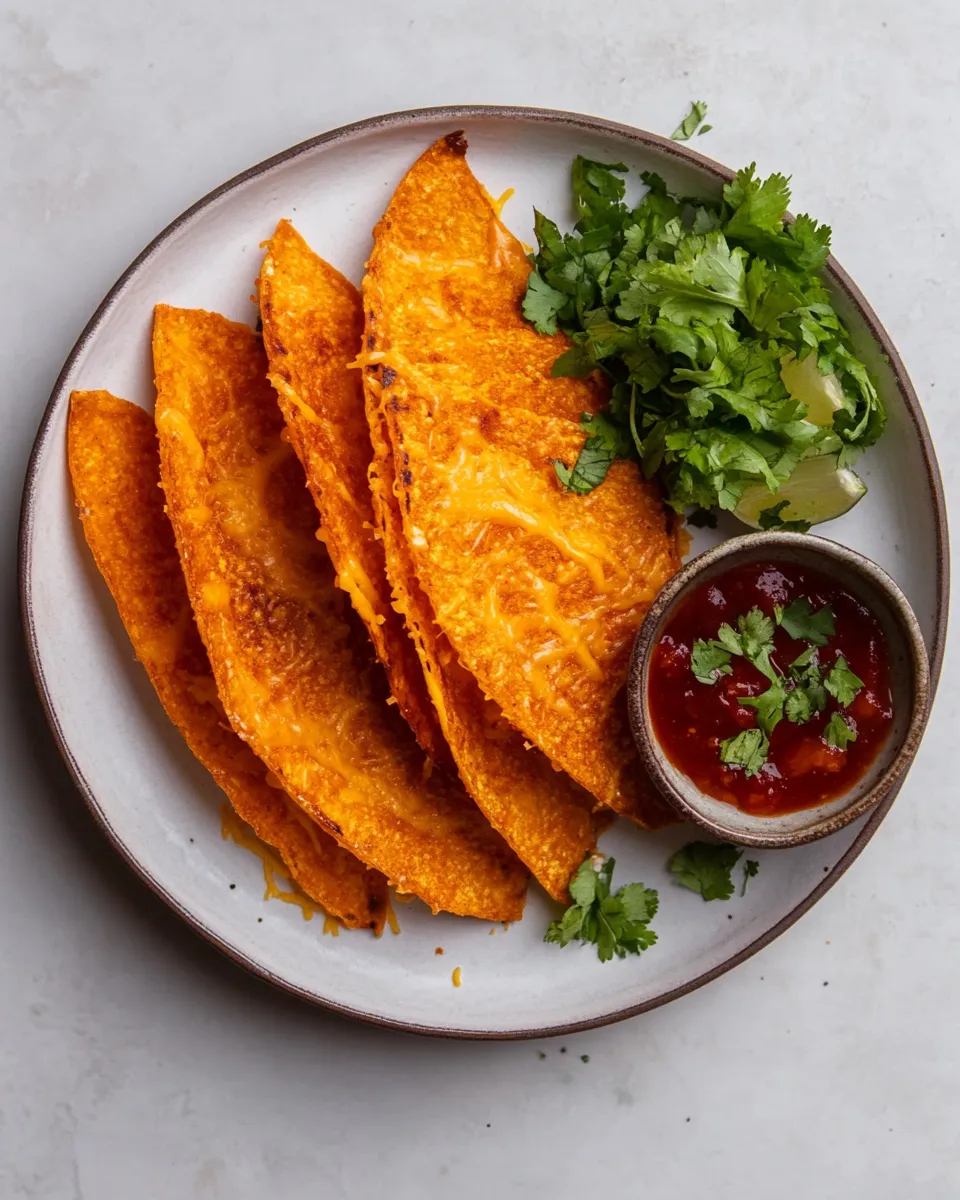
Cheese Taco Shells
These cheese taco shells are the sort of kitchen trick I reach for when I want tacos in minutes with zero grocery-store trips. They take one ingredient—sharp cheddar—and turn it into a crisp, gluten-free shell that holds fillings without getting soggy. The texture is crunchy, the flavor is pure cheddar, and they come together faster than heating a bag of tortillas.
No special skills required. You’ll bake small cheddar discs until the edges brown, then drape them over a cylinder while still warm to form tacos. The technique is forgiving: timing and a quick hand give you consistent shells, and once you make a batch you’ll notice how handy they are for quick weeknight dinners or party bites.
I include practical tips for equipment, common mistakes, seasonal variations, and storage so you can make these reliably. Use the shells for beef, chicken, roasted vegetables, or just a handful of fresh salsa and avocado—either way, they deliver big on texture and flavor.
Ingredient Rundown
- 2cups sharp shredded cheddar cheese — the sole ingredient; sharp cheddar melts well and crisps into a sturdy, flavorful shell. Use freshly shredded for best melting and texture.
Cheese Taco Shells — Do This Next
Read the full method once through so timing and setup are clear, then preheat the oven. Line sheets and have your forming tool ready—wooden spoon handle, narrow rolling pin, or similar cylindrical object. Work in small batches so shells are formed while still warm and pliable.
What You’ll Love About This Recipe
- Single-ingredient simplicity—no dough, no gluten.
- Ready in about 10–12 minutes per batch (including brief cooling and shaping).
- Crisp texture that holds wet fillings longer than a tortilla would.
- Easy to scale: make more or fewer shells depending on your needs.
International Equivalents
Cheese taco shells are a modern, ingredient-driven twist rather than a traditional international dish, so there’s no direct cultural equivalent. For similar concepts: Latin American tostadas use a crisp base, Italian frico is a crisped cheese wafer, and Scandinavian cheese crisps are enjoyed as snack crackers. All emphasize crisped cheese as the main component.
Before You Start: Equipment
- Rimmed baking sheet — catches any melted oil and keeps edges crisp.
- Parchment paper — prevents sticking and makes cleanup easier.
- Scoop or measuring cup (1/4 cup) — for consistent shell size.
- Flat spatula — to lift cooked cheese rounds gently.
- Wooden spoon handle, narrow rolling pin, or similar cylinder — for draping and shaping shells while warm.
- Cooling rack or another baking sheet — to let shaped shells cool and harden fully.
Frequent Missteps to Avoid
- Using pre-shredded cheese with anti-caking agents — it can inhibit melting and cause uneven texture. Opt for freshly shredded cheddar when possible.
- Making the discs too big — 1/4 cup yields about a 5-inch diameter; larger discs spread thin and crisp too quickly at the edges while remaining gummy in the center.
- Overbaking — once edges are brown and crispy but the center is still slightly soft, pull them. Overbaking makes shells brittle and more likely to crack when forming.
- Waiting too long to shape — cheese needs to be pliable. If it cools completely it will harden flat; if it’s too hot it may sag excessively. Aim to shape within 2–3 minutes after removing from the oven.
Variations by Season
Spring
- Fill with quick-pickled radishes, young greens, and grilled shrimp for a bright taco.
Summer
- Use fresh tomato salsa, corn, and avocado—these fresh flavors pair beautifully with sharp cheddar.
Autumn
- Try roasted butternut squash, caramelized onions, and a sprinkle of pumpkin seeds for a cozy riff.
Winter
- Fill with braised beef or shredded rotisserie chicken and warm, spiced slaw for a hearty meal.
Method to the Madness
Follow these step-by-step directions. They mirror the source method exactly in order and quantity but are phrased for clarity and to make the process simple to follow.
- Preheat your oven to 400°F (200°C). Position a rack in the middle of the oven for even browning.
- Line a rimmed baking sheet with parchment paper. This prevents sticking and makes it easier to transfer shells off the sheet.
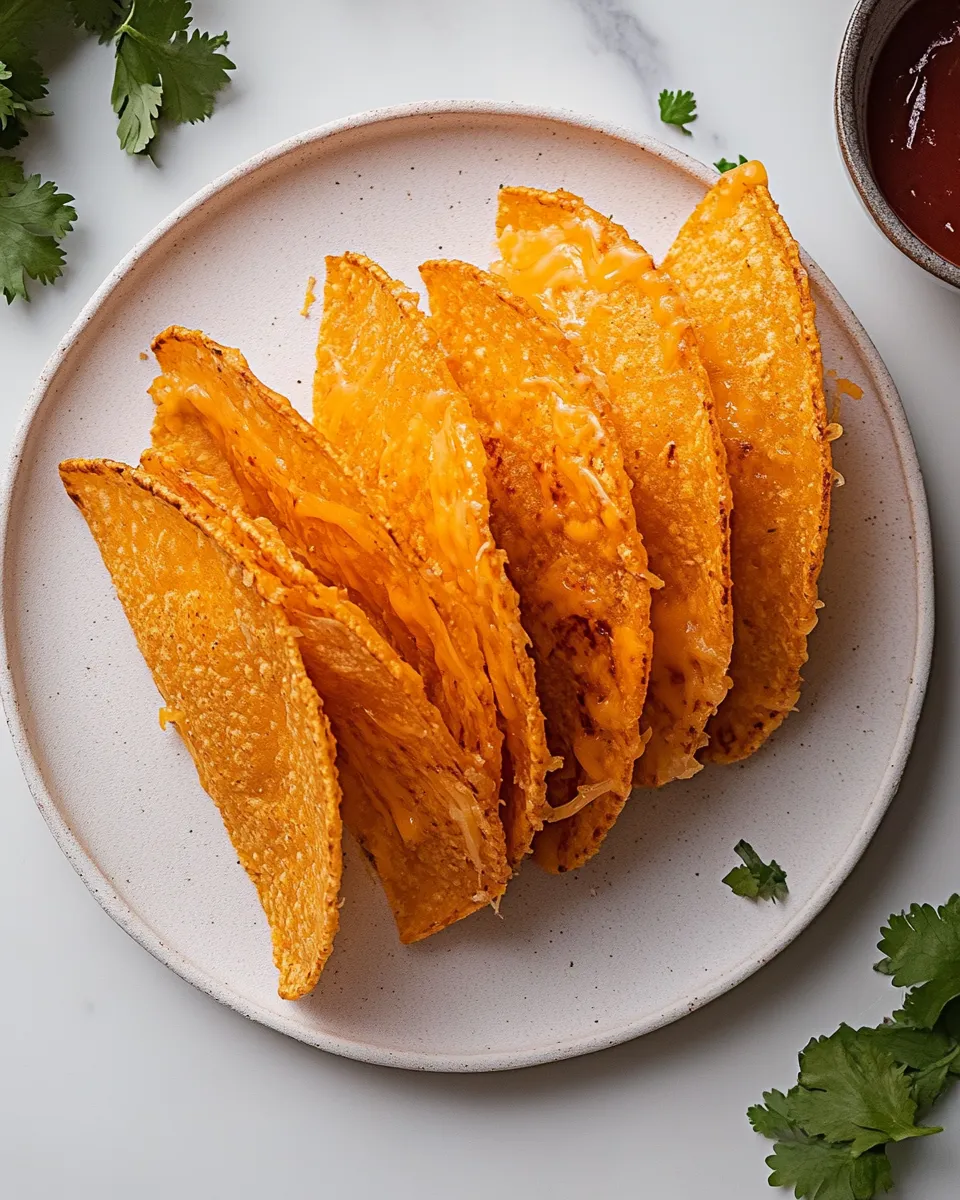
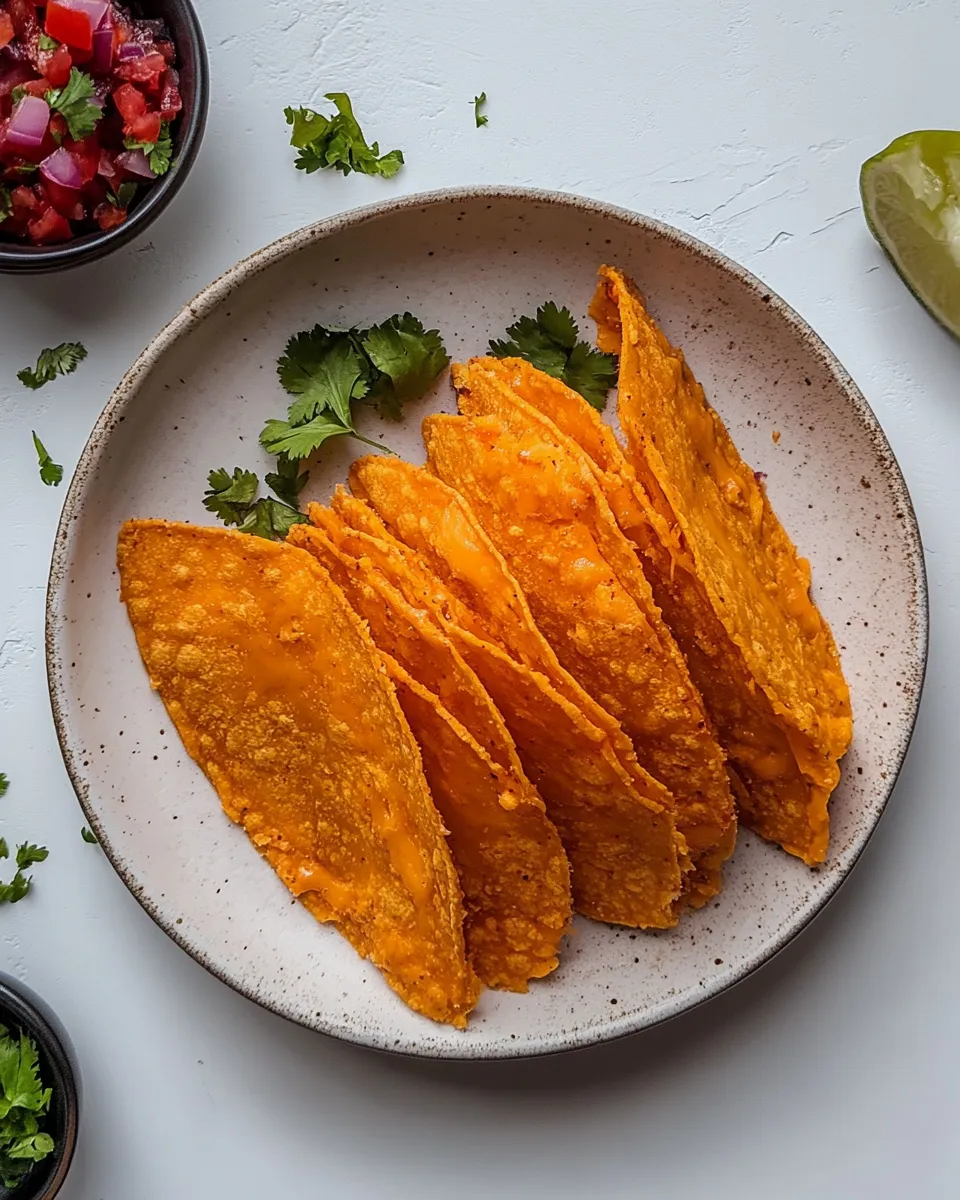
- Measure 1/4 cup of the sharp shredded cheddar cheese for each shell. Place each 1/4-cup mound on the prepared baking sheet, spacing them so they don’t spread into one another. Flatten each mound gently with the back of a spoon into a circle about 5 inches in diameter. You should be able to fit about three circles per standard baking sheet; adjust spacing for your sheet size.
- Bake in the preheated oven for 6 to 8 minutes. Watch the edges: you’ll want them to turn brown and crispy while the centers remain slightly soft. Exact time depends on your oven and how thinly you flattened the cheese.
- Remove the sheet from the oven and let the cheese rounds cool on the sheet for 2 to 3 minutes. This short rest firms them slightly but keeps them pliable for shaping.
- Carefully lift each warm cheese round with a thin spatula. Immediately drape it over a wooden spoon handle, narrow rolling pin, or similar cylindrical object to form a taco-shell shape. Press gently to create the crease along the top if you want a pronounced taco profile.
- Transfer the shaped shells to a cooling rack or another baking sheet and allow them to cool completely. As they cool, they will harden into crisp shells ready to fill.
Save It for Later
- Store cooled shells in an airtight container at room temperature for up to 2 days; they stay crisp if kept dry.
- If they lose some crispness, re-crisp in a 325°F oven for 3–5 minutes. Let cool briefly before filling.
- Do not refrigerate shells — moisture can make them soggy. For longer storage, freeze flat in a sealed container with parchment between layers; thaw at room temperature and re-crisp in the oven if needed.
Questions People Ask
- Can I use other cheeses? — The recipe lists sharp cheddar only. Cheeses with similar moisture and melting properties (like aged Colby or mature cheddar variants) will behave similarly, but stick to freshly shredded versions for best results.
- Why do some shells crack? — Overbaking or shaping after they’ve fully cooled causes cracking. Shape while still slightly pliable (2–3 minutes after baking) and avoid excessive force.
- Can I make smaller or larger shells? — Yes. The instructions use 1/4 cup for ~5-inch shells. Reduce or increase the portion size, but adjust baking time and expect different crisping behavior—larger discs may need an extra minute or two and risk uneven doneness.
- Will they hold saucy fillings? — They hold better than tortillas for short periods, but very wet fillings will eventually soften them. Layer with lettuce or a smear of guacamole as a moisture barrier for saucier toppings.
In Closing
Cheese taco shells are a fast, satisfying way to serve tacos with bold cheddar flavor and a crisp crunch. The technique is simple: 1/4-cup discs, 6–8 minutes in a 400°F oven, and a quick drape over a cylinder while warm. Once you try them, they become a versatile go-to for appetizers, weeknight dinners, or gluten-free entertaining.
Make a test batch first to dial in oven timing with your specific cheese and sheet. After that, the process is quick and reliably delicious. Enjoy building tacos that celebrate the cheese as much as the filling.

Cheese Taco Shells
Ingredients
- 2 cups sharp cheddar cheese, shredded
Instructions
- Preheat the oven to 400°F (200°C) and line a baking sheet with parchment paper.
- Measure 1/4 cup of shredded cheddar and place it on the prepared sheet; flatten each mound into a 5-inch (about 12 cm) circle. Leave space between each; you should fit about 3 per sheet.
- Bake for 6–8 minutes, until the edges are brown and crispy and the center is still slightly soft.
- Remove the baking sheet from the oven and let the cheese cool 2–3 minutes so it firms but is still pliable.
- Carefully lift each cheese round with a spatula and drape it over a wooden spoon handle, narrow rolling pin, or similar cylinder to form a taco shell shape.
- Allow the shells to cool completely so they harden before filling.
Equipment
- Baking Sheet
- Parchment Paper
- measuring cup
- Spatula
- wooden spoon handle or small rolling pin
Notes
- Use fresh shredded cheese for best melting and crisping.
- Work quickly when shaping so the cheese is still pliable.
- One batch yields about 8 shells using 1/4 cup per shell.