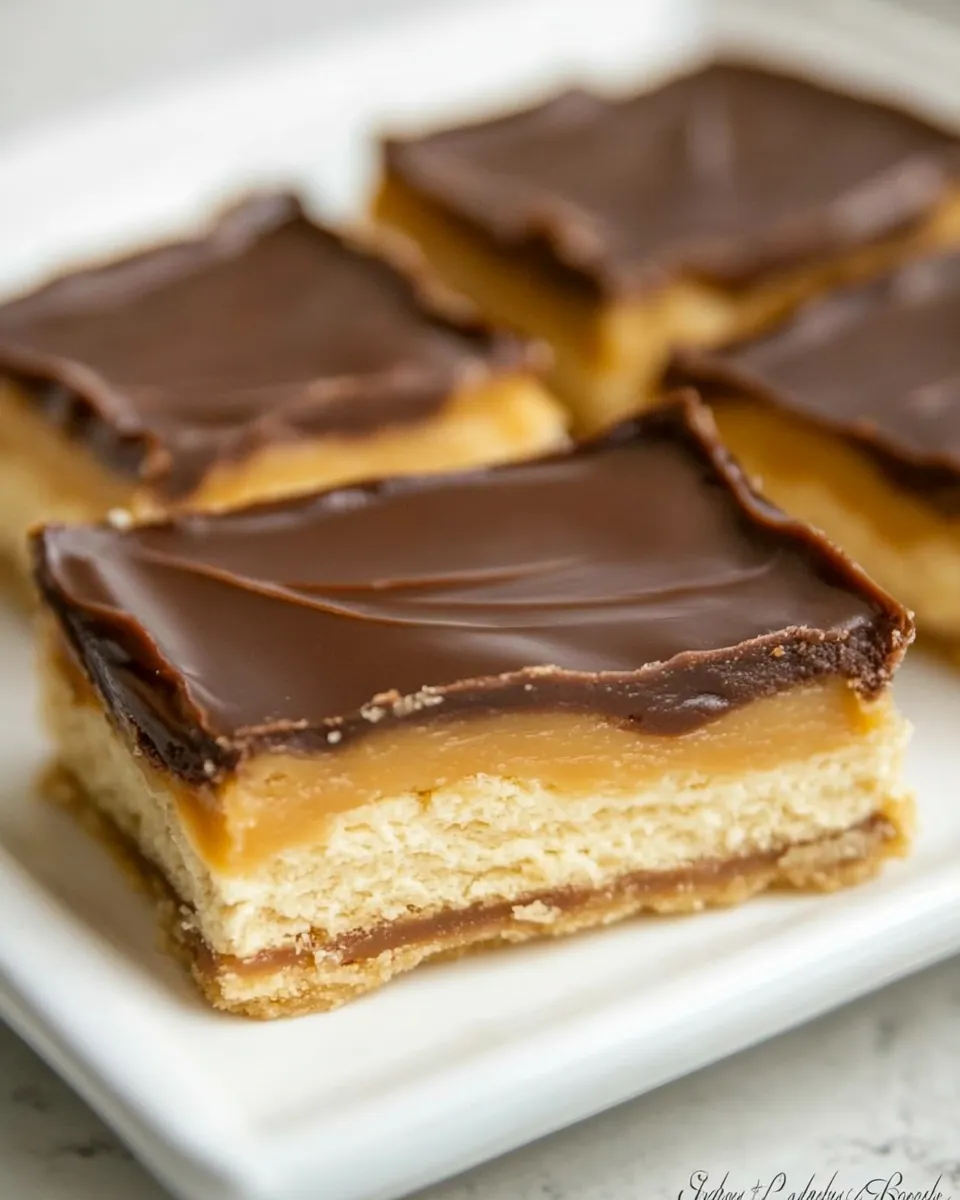
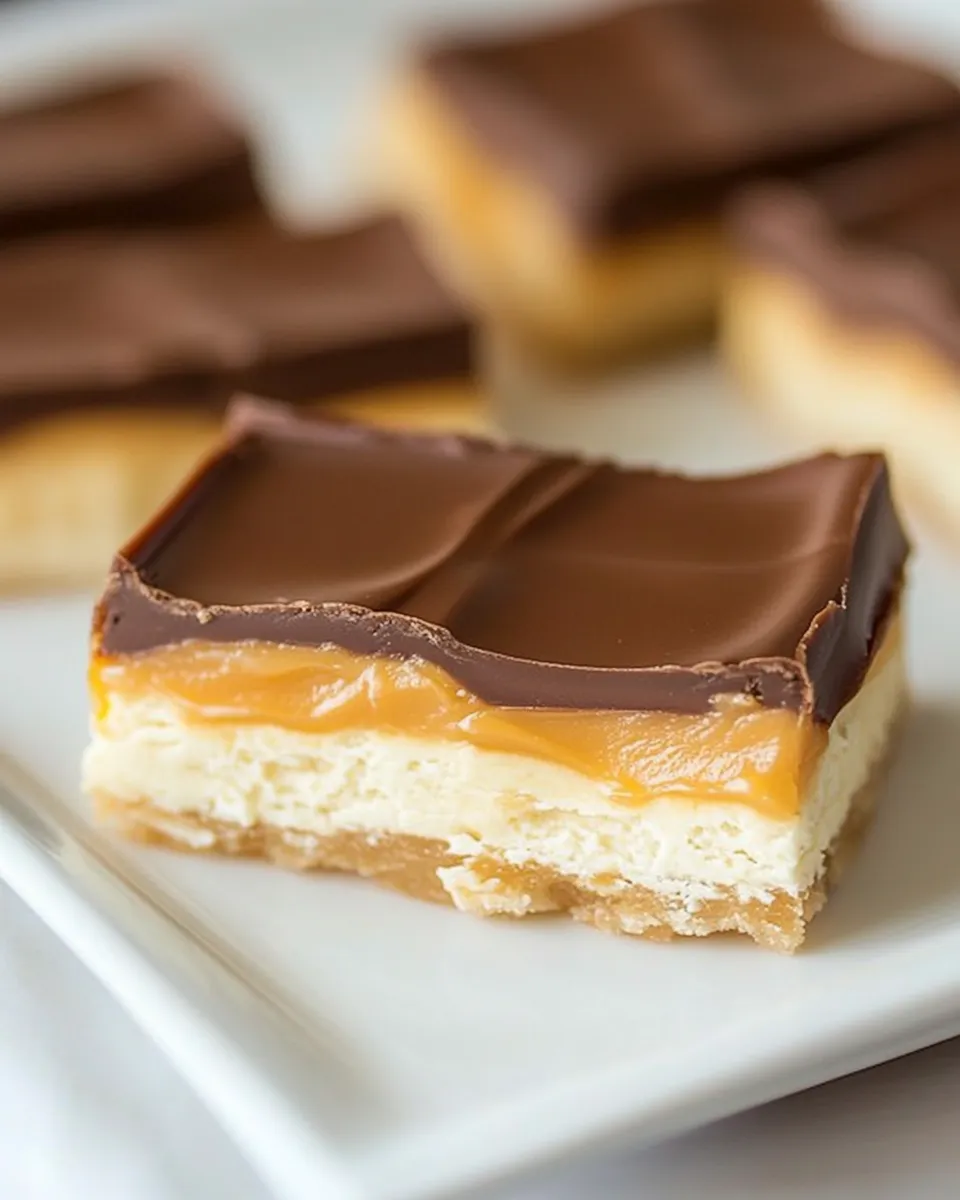
Tagalong Bars
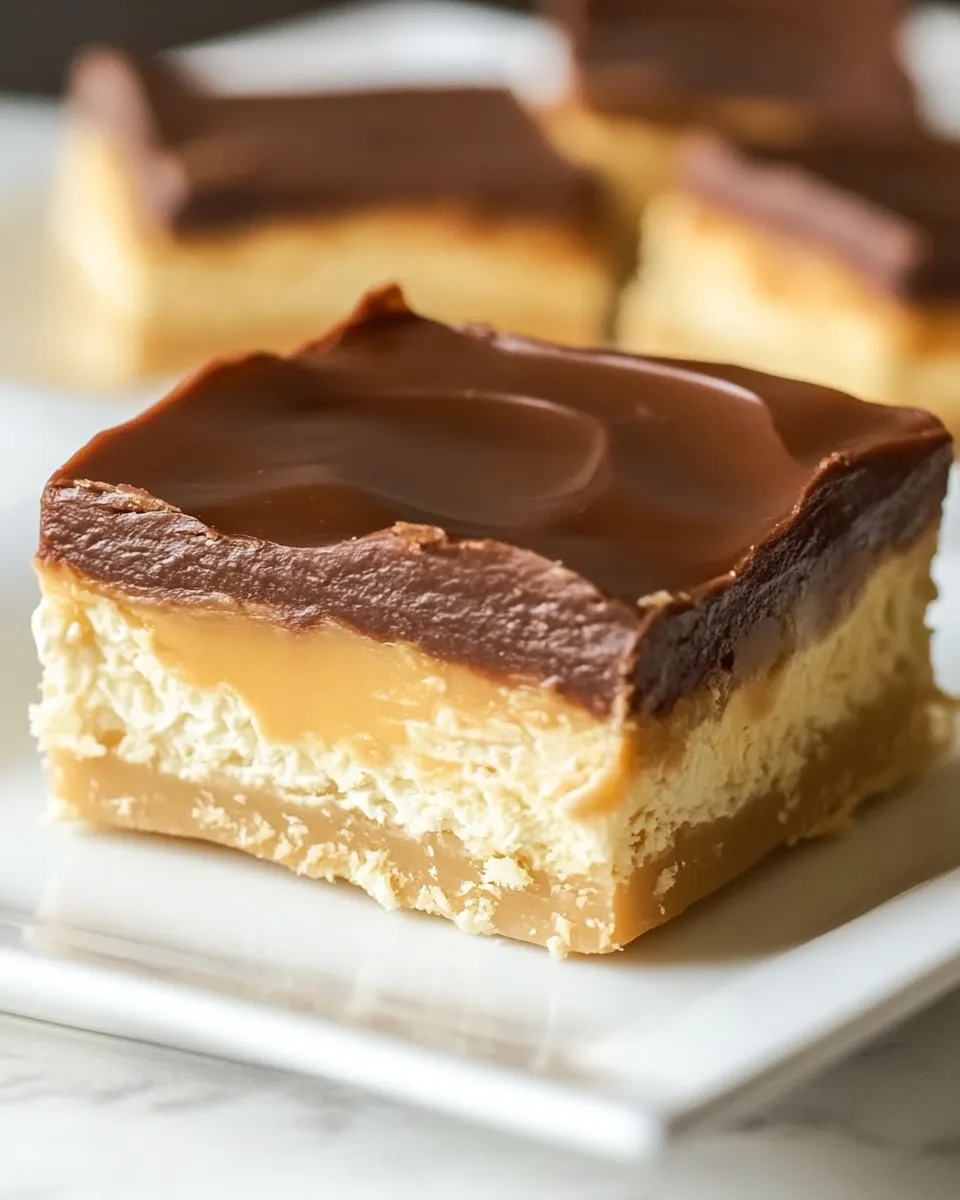
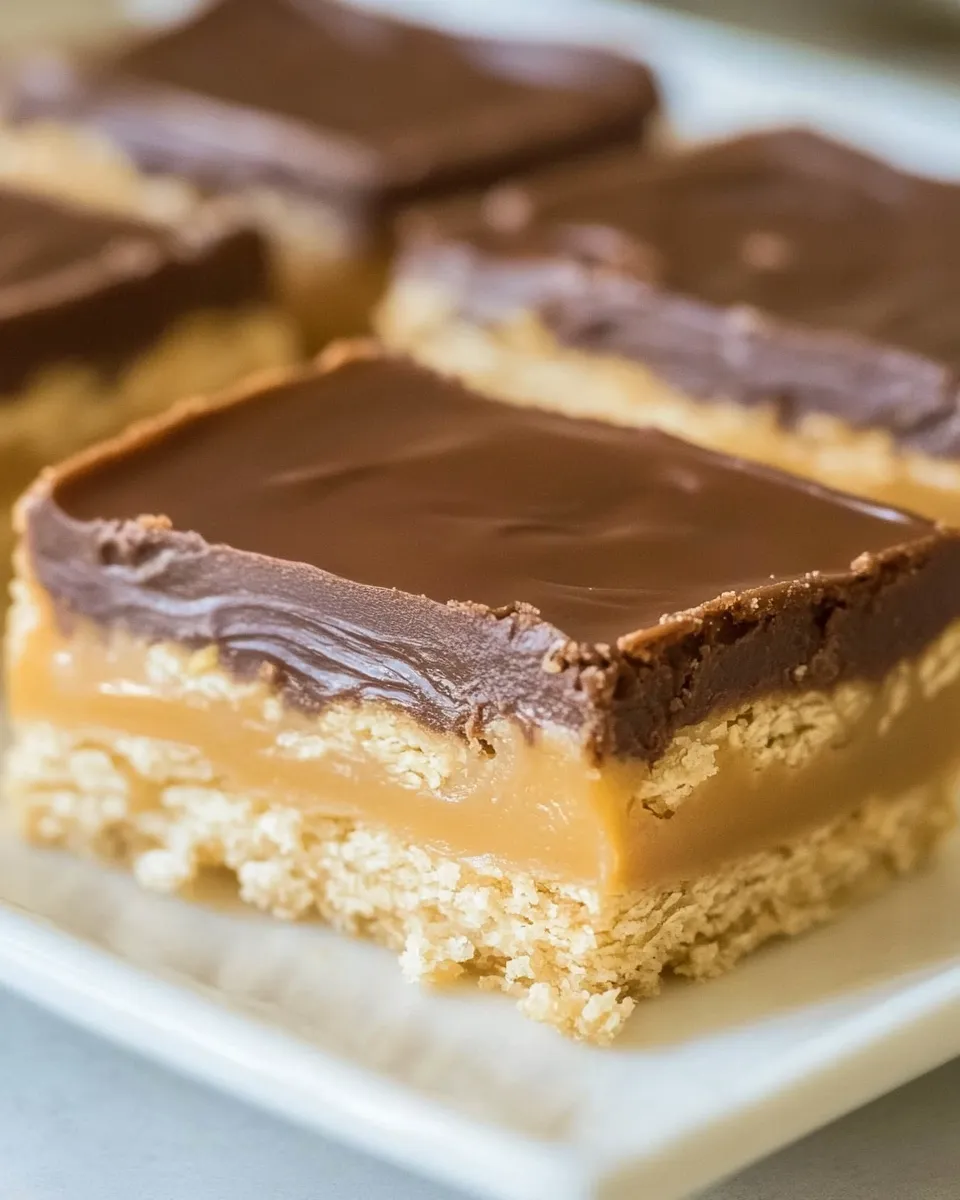
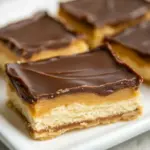
These Tagalong Bars are my no-fuss shortcut to that perfect peanut butter–chocolate combo everyone loves. They have a tender, buttery shortbread base, a smooth peanut butter layer, and a glossy chocolate topping. They hold together well, cut cleanly, and make a great bake-ahead treat for school lunches, potlucks, or a quick dessert.
The method is straightforward: a baked shortbread crust, a chilled peanut butter filling, and a warm chocolate-cream glaze. Nothing fussy. The steps below keep to simple techniques so you can get consistent bars every time.
I include practical notes on shopping, tool swaps, mistakes to avoid, and storage so you can make these without surprises. If you like that classic cookie flavor in bar form, this recipe will quickly become a staple.
Your Shopping Guide
Buy ingredients that make the base and filling smooth and stable. The recipe uses basic pantry staples—butter, powdered sugar, flour—and ingredients for the filling and topping. Choose full-fat, creamy peanut butter for a richer, more spreadable filling and real vanilla extract (not imitation) for better flavor. For the chocolate topping, pick semi-sweet or milk chocolate chips depending on how sweet you want the final bar.
- 1 cup butter, room temperature — Use unsalted or salted depending on preference; room temp butter creams easiest and gives tender shortbread.
- 3/4 cup powdered sugar — Contributes sweetness and structure to the crust; sift if clumpy.
- 1 teaspoon vanilla — Adds flavor depth; use pure vanilla extract if possible.
- 1/2 teaspoon salt — Balances sweetness and enhances the butter and peanut butter flavors.
- 2 cups flour — All-purpose flour is assumed; provides the structure for the crust.
Cook Tagalong Bars Like This
Equipment and oven
Preheat the oven to 350°F. Line a 9×9-inch pan with nonstick aluminum foil, or use regular foil sprayed with non-stick spray so the bars release easily.
Make the crust
- In a mixing bowl, cream 1 cup room-temperature butter and 3/4 cup powdered sugar with an electric mixer on medium speed for about 1–2 minutes, until the mixture is light and creamy.
- Reduce the mixer speed to low and add 1 teaspoon vanilla, 1/2 teaspoon salt, and 2 cups flour. Mix just until the flour is incorporated and you have a uniform dough—do not overmix.
- Press the dough evenly into the prepared 9×9-inch pan. Use the bottom of a measuring cup or your fingertips to get a smooth, compact layer.
- Bake in the preheated 350°F oven for 20 minutes, or until the crust turns a light golden color around the edges.
- Remove from oven and allow the crust to cool completely in the pan before adding the filling. Cooling ensures the filling sets properly and the layers remain distinct.
Make the peanut butter filling
- In a clean bowl, beat together the peanut butter, powdered sugar, and vanilla until smooth. (The source directions list “peanut butter, powdered sugar and vanilla”—keep their amounts, and mix until you have a spreadable, lump-free filling.)
- Spread the peanut butter filling evenly over the cooled crust. Use an offset spatula or the back of a spoon to smooth the top for an even layer.
- Chill the pan in the refrigerator for about 30 minutes to firm the filling. This makes it easier to add the chocolate layer without mixing or sinking.
Finish with the chocolate topping
- Gently microwave your chocolate chips and cream in short bursts, stirring frequently, until the mixture is smooth and pourable. (Heat just until melted; over-heating can scorch chocolate.)
- Pour or spread the warm chocolate mixture over the chilled peanut butter layer and smooth the surface quickly with a spatula.
- Chill briefly until the chocolate sets—this could be 15–30 minutes depending on your refrigerator. Once set, lift the bars from the pan using the foil and cut into squares.
- Serve and enjoy. Store extras according to the storage tips below.
Why Cooks Rave About It
These bars combine textures and flavors people love: a tender buttery crust, creamy peanut butter, and a glossy chocolate finish. The recipe’s structure keeps the filling stable; chilling between layers prevents sinking or mixing. Also, they’re easy to customize—switch the chocolate level, or cut size, and they still hold their shape well.
Budget & Availability Swaps
Peanut butter and basic baking staples are inexpensive and widely available. If you want to reduce cost or use pantry items:
- Swap real vanilla for imitation vanilla to save money—flavor will be slightly less complex but still good.
- If you don’t have chocolate chips, chop a chocolate bar into small pieces and melt with a splash of cream or a teaspoon of butter.
- Use store-brand powdered sugar and butter; the bars will still be tasty though flavor depth varies by brand.
Prep & Cook Tools
- 9×9-inch baking pan lined with nonstick foil — ensures easy removal and tidy cutting.
- Electric mixer (hand or stand) — for creaming butter into a light crust and smoothing the filling quickly.
- Offset spatula or flexible spatula — helps spread and smooth the peanut butter layer and chocolate.
- Microwave-safe bowl — for melting chocolate and cream safely in short bursts.
- Measuring cups and spoons — accurate baking measurements give reliable texture.
Avoid These Mistakes
- Using cold butter — it won’t cream properly; the crust will be dense. Bring butter to room temperature first.
- Skipping the chill between peanut butter and chocolate — filling can mix into the topping. Chill the peanut butter layer about 30 minutes before adding chocolate.
- Overheating chocolate — microwave in short bursts, stirring between, to avoid scalded or grainy chocolate.
- Cutting while warm — wait until the chocolate is fully set so bars cut cleanly without smearing.
Seasonal Flavor Boosts
Minor additions can freshen these bars for different seasons. Add a pinch of cinnamon or a dash of sea salt on top in fall and winter. In summer, sprinkle finely chopped toasted peanuts over the chocolate before it sets for a little crunch and contrast. For holidays, decorate with festive sprinkles or drizzle white chocolate in a zigzag pattern.
Chef’s Rationale
The technique focuses on controlling temperatures and layer stability. Baking the shortbread first creates a drier, sturdy base that supports the softer peanut butter layer. Chilling the peanut butter filling firms it so the warm chocolate won’t melt or sink in. Finally, a gentle melt-and-spread chocolate finish produces a glossy top that sets into clean slices. Each step maintains separation of textures while keeping the process simple for home bakers.
Storing Tips & Timelines
Keep bars in an airtight container. They hold well at room temperature for 2–3 days if your kitchen is cool. For longer storage, refrigerate up to 1 week; the chocolate topping will be firmer and the peanut butter layer dense. Freeze individual squares separated by parchment for up to 3 months—thaw in the refrigerator before serving.
Questions People Ask
- Can I use crunchy peanut butter? — Yes. Crunchy peanut butter will add texture to the filling; smooth spreads more evenly.
- What if my crust cracks when pressing? — Press gently and evenly; if it cracks slightly, smooth it with damp fingers or a flat measuring cup base.
- Can I make these gluten-free? — Substitute a 1:1 gluten-free flour blend for the 2 cups of all-purpose flour, but expect slight texture changes.
- Why did my chocolate seize? — Likely overheated or water got into the chocolate. Stir frequently and add a small amount of cream to smooth if needed.
Let’s Eat
Cut these bars into small squares for gatherings or larger rectangles for snack portions. They travel well and pair nicely with coffee, milk, or tea. Serve slightly chilled for the cleanest slices and a pleasant balance of firm chocolate and soft peanut butter.
Tagalong Bars
Ingredients
- 1 cup butter room temperature
- 3/4 cup powdered sugar
- 1 teaspoon vanilla extract
- 1/2 teaspoon salt
- 2 cups all-purpose flour
- 1 cup peanut butter smooth
- 1 cup powdered sugar for peanut butter filling
- chocolate chips for topping (amount as desired)
- heavy cream for melting chocolate (small splash)
Instructions
- Preheat the oven to 350°F (175°C). Line a 9x9-inch baking pan with nonstick aluminum foil or parchment, leaving an overhang for easy removal; spray with nonstick spray if using regular foil.
- Make the crust: in a mixing bowl, beat 1 cup room-temperature butter and 3/4 cup powdered sugar on medium speed until light and creamy, about 1–2 minutes.
- Reduce mixer speed to low and add 1 teaspoon vanilla, 1/2 teaspoon salt, and 2 cups all-purpose flour. Mix just until the flour is incorporated and a dough forms.
- Press the dough evenly into the prepared pan and bake for 20 minutes, or until the edges are lightly golden. Remove from oven and cool completely in the pan.
- Make the peanut butter filling: in a bowl, beat 1 cup smooth peanut butter with 1 cup powdered sugar and 1 teaspoon vanilla until smooth and spreadable.
- Spread the peanut butter filling evenly over the cooled crust and smooth the top with an offset spatula. Chill in the refrigerator for about 30 minutes to firm up.
- Prepare the chocolate topping: gently melt chocolate chips with a small splash of heavy cream in a microwave-safe bowl, heating in 15–20 second intervals and stirring between each until smooth; alternatively use a double boiler.
- Pour or spread the melted chocolate over the chilled peanut butter layer and refrigerate briefly until the chocolate is set.
- Once set, lift the bars from the pan using the foil overhang, cut into squares, and serve.
Equipment
- 9x9 inch baking pan
- Mixer (stand or hand)
- Mixing bowls
- Offset spatula or knife
- Microwave-safe bowl or double boiler
- Parchment or nonstick foil
Notes
- Use smooth peanut butter for a creamy filling.
- Chill the peanut butter layer so the chocolate topping sets smoothly.
- Heat chocolate slowly to avoid seizing.
- Line the pan for easy removal and cleaner slices.