Slice and Bake Chocolate Peanut Butter Cookies
I love recipes that do a lot of the work upfront and reward you for chilling out—literally. These slice-and-bake cookies are exactly that: you mix once, shape twice, and bake whenever you want fresh cookies. The dough keeps well in the fridge or freezer, so you can slice off a few whenever a chocolate-peanut butter craving hits.
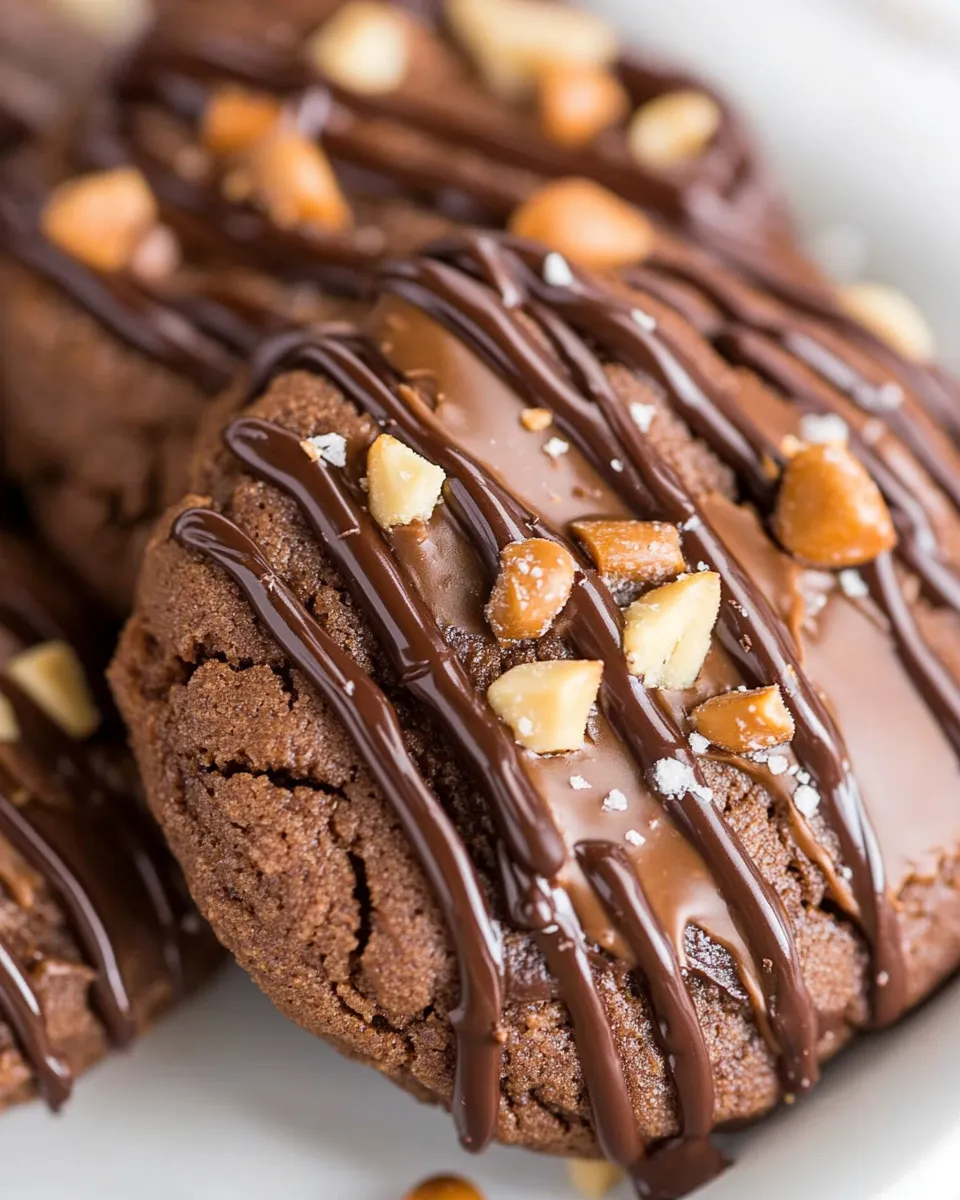
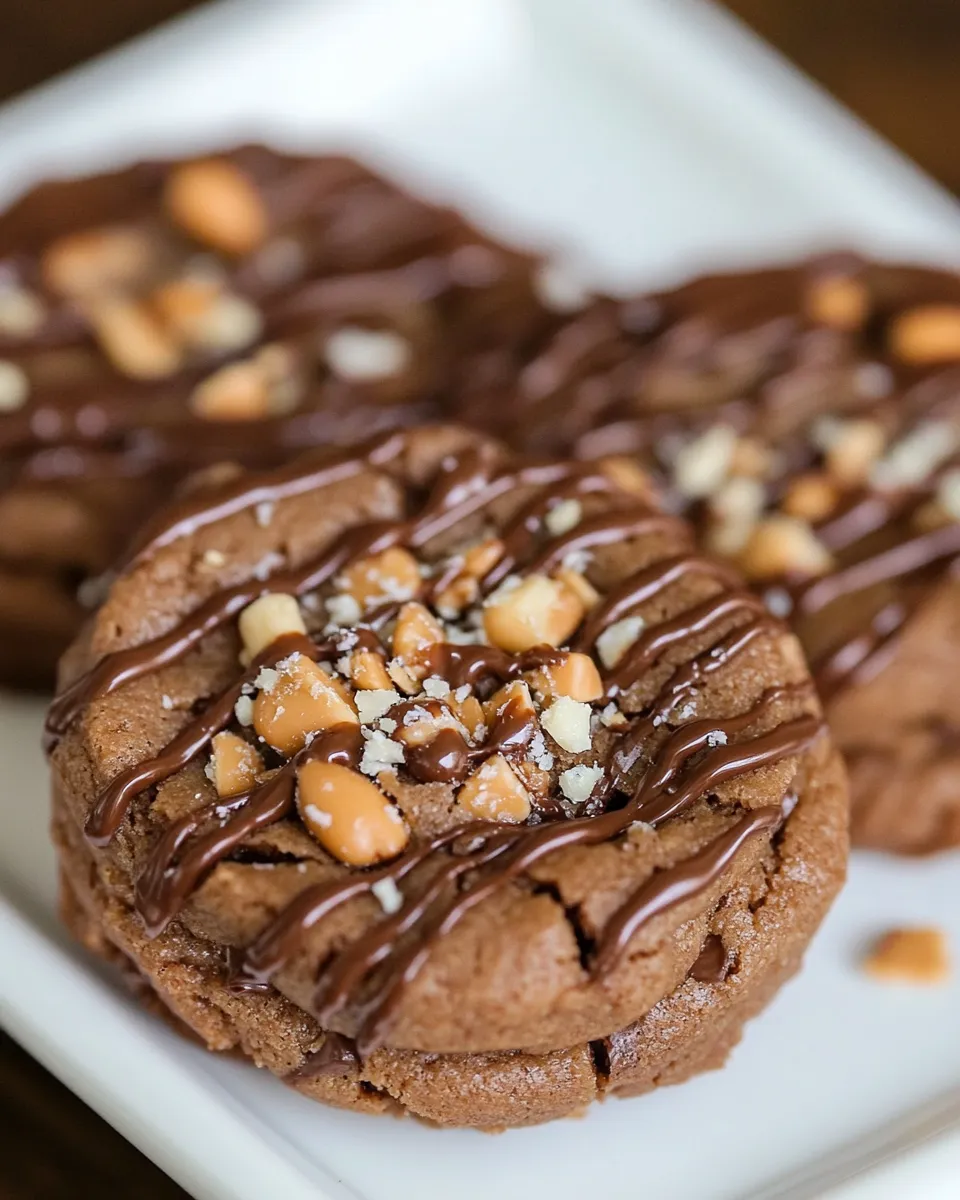
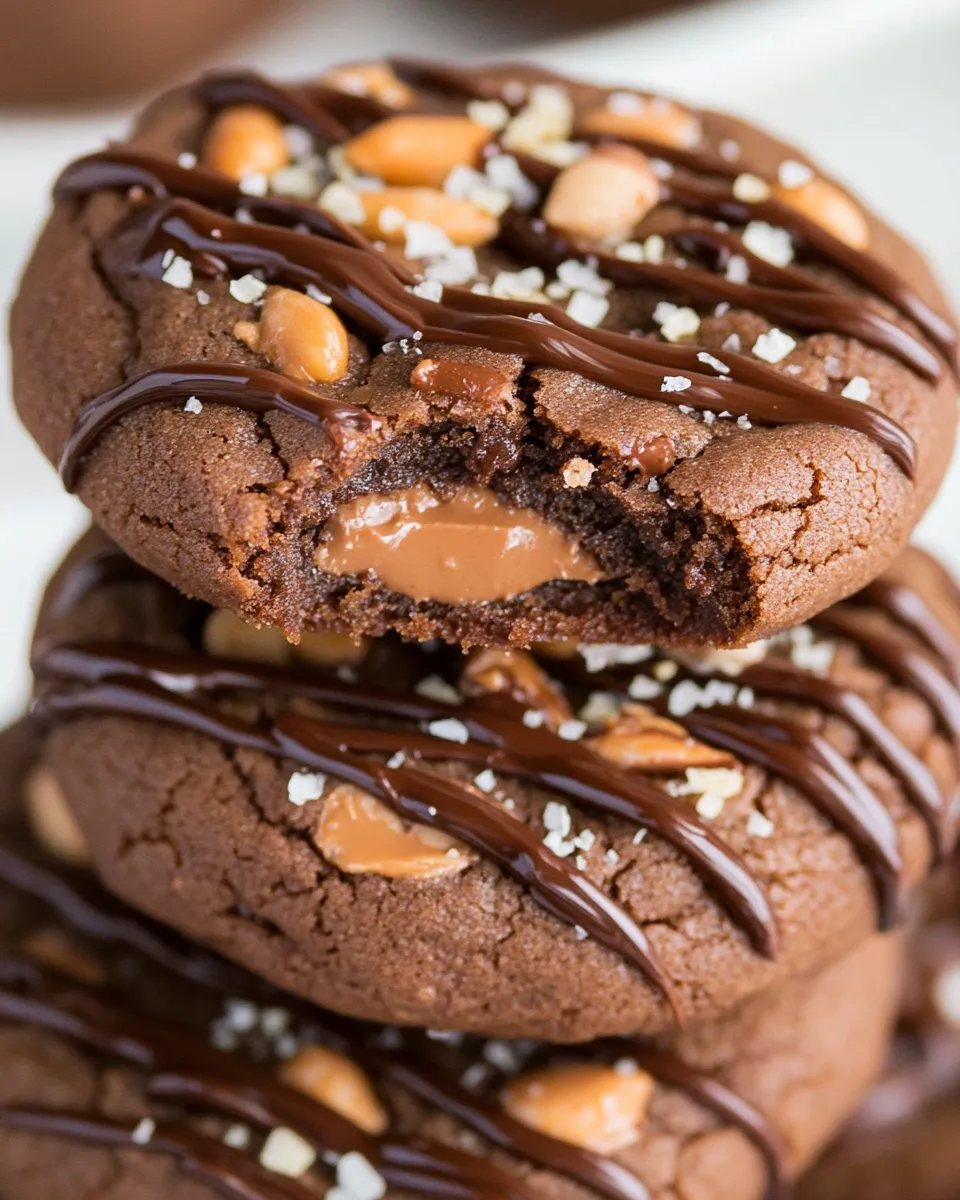
The texture is tender with a slight chew, thanks to brown sugar and the creamy peanut butter, while the cocoa adds a deep chocolate backbone. A quick dip or drizzle of melted chocolate and a sprinkle of toasted peanuts, toffee, or coconut turns these into something special for guests or a cozy evening in.
These instructions are straightforward and designed for home bakers. I’ll walk you through the ingredients with quick notes, step-by-step directions that respect the exact ingredient amounts, and practical tips for chilling, slicing, and finishing the cookies.
Ingredients at a Glance
- 1 ½ cups (300g) packed brown sugar — provides moisture, chew, and a toffee-like flavor.
- ½ cup (113g) unsalted butter, softened — for richness and structure; soften to room temperature for easy mixing.
- ½ cup (133g) creamy peanut butter (no-stir brand) — key flavor and fat; a no-stir variety keeps texture consistent.
- 2 large eggs — bind the dough and add lift.
- 1 teaspoon vanilla extract — rounds and brightens the chocolate-peanut butter flavors.
- 2 cups (224g) all-purpose flour — the base that holds the cookies together.
- ½ cup (40g) unsweetened cocoa powder — gives chocolate intensity; sift or whisk to remove lumps.
- 2 teaspoons baking powder — leavening that gives a gentle rise and lifts the crumb.
- 1 cup (170g) chocolate chips — for melting into a glaze; use semi-sweet or milk as you prefer.
- 1 tablespoon vegetable oil or shortening — thins the melted chocolate for a glossy dip or drizzle.
- 1 cup chopped peanuts, toffee bits, toasted coconut, sprinkles, or other similar items for garnish — adds texture and visual appeal; pick one or mix a few.
Cooking Slice and Bake Chocolate Peanut Butter Cookies: The Process
- In a large mixing bowl, combine 1 ½ cups (300g) packed brown sugar, ½ cup (113g) unsalted butter, softened, and ½ cup (133g) creamy peanut butter (no-stir brand). Using a hand mixer, beat on medium speed until the mixture is creamy and well combined, about 2 minutes.
- Add 2 large eggs and 1 teaspoon vanilla extract to the bowl. Continue beating until the eggs and vanilla are fully incorporated and the mixture is smooth.
- With the mixer on low speed, add 2 cups (224g) all-purpose flour, ½ cup (40g) unsweetened cocoa powder, and 2 teaspoons baking powder. Mix until the dry ingredients are evenly blended into the dough and no streaks remain. Scrape the bowl as needed to ensure uniform mixing.
- Divide the dough into two equal portions. On a sheet of plastic wrap, shape each portion into a tight log about 1 1/2 to 2 inches in diameter. Wrap each log securely in the plastic wrap so the ends are sealed.
- Chill the wrapped logs in the refrigerator until firm, at least 4 hours or overnight. If you need the dough firm more quickly, place the logs in the freezer for 1–2 hours—check periodically so they don’t freeze solid.
- When ready to bake, preheat the oven to 350°F (175°C). Line two baking sheets with parchment paper or silicone baking mats.
- Unwrap one dough log at a time. Using a sharp knife, cut the log into 1/4-inch-thick slices. Transfer the slices to the prepared baking sheets, spacing them about 2 inches apart to allow for slight spreading.
- Bake in the preheated oven for 8–10 minutes, or until the tops lose their glossy sheen and the edges are set. Avoid overbaking for a tender center.
- Let the cookies cool on the baking sheets for 10 minutes, then transfer them to a wire rack to cool completely.
- To make the chocolate coating, place 1 cup (170g) chocolate chips and 1 tablespoon vegetable oil or shortening in a microwave-safe bowl. Heat at 50% power for about 2–3 minutes, stirring every 30 seconds, until the chocolate is fully melted and smooth.
- Either dip each cooled cookie into the melted chocolate and immediately sprinkle with your chosen garnish, or put the melted chocolate in a small sandwich bag, snip a tiny corner, and drizzle decoratively over the cookies. Add chopped peanuts, toffee bits, toasted coconut, sprinkles, or other toppings while the chocolate is still wet so they adhere.
Why Cooks Rave About It
This recipe holds appeal because of its convenience and consistency. You can make dough ahead, which is perfect for planned events or unexpected company. The combination of brown sugar and peanut butter yields a cookie that’s richly flavored without being overly sweet; cocoa gives it depth without competing with the peanut butter. The finishing step—dipping or drizzling—lets you control sweetness and presentation, so they can be casual snack cookies or dressed up for gifting.
If You’re Out Of…
- If you’re out of unsalted butter — use salted butter but reduce any additional salt in other recipes around the meal.
- If you don’t have a no-stir peanut butter — use a regular creamy peanut butter but mix well before measuring to ensure oils are incorporated.
- If you lack chocolate chips — chop a chocolate bar to equal the 1 cup (170g) amount.
- If you don’t have vegetable oil or shortening for the glaze — a neutral oil like light olive oil or a small amount of butter can work, but use sparingly to maintain gloss.
Equipment & Tools
- Large mixing bowl — for combining the wet and dry ingredients.
- Hand mixer — speeds creaming the butter, sugar, and peanut butter; you can use a stand mixer if preferred.
- Plastic wrap — to form and chill the dough logs.
- Sharp knife — for clean, even slices.
- Baking sheets lined with parchment paper or silicone baking mats — prevents sticking and promotes even browning.
- Wire cooling rack — cools cookies evenly after the initial sheet rest.
- Microwave-safe bowl or double boiler — to melt chocolate chips.
- Sandwich bag (optional) — for controlled drizzling of melted chocolate.
What Not to Do
- Do not skip chilling the dough. Soft dough will spread and yield flat, greasy cookies.
- Do not cut slices too thick; 1/4″ gives the intended texture and bake time.
- Do not overbake. Remove when the glossy sheen fades—cookies will continue to set while cooling.
- Do not try to dip warm cookies. They’ll crumble and the chocolate won’t set nicely.
- Do not crowd the baking sheet. Leave about 2″ between slices to avoid sticking together.
Fresh Takes Through the Year
- Holiday gift boxes: slice and bake several dough logs flavored identically, freeze, and bake fresh batches for gifting throughout the season.
- Summer twist: top with toasted coconut and a light drizzle of milk chocolate for a tropical take.
- Autumn comfort: add a sprinkle of flaky sea salt plus chopped, roasted peanuts for a salty-sweet finish.
- Party-friendly: decorate with colored sprinkles to match any celebration—dip half the cookie for variety.
Method to the Madness
Timing plan
- Active prep: about 15–20 minutes to mix, shape, and wrap the dough.
- Chill time: minimum 4 hours; overnight preferred. Or freeze 1–2 hours to speed things up.
- Bake time: about 8–10 minutes per batch, plus 10 minutes cooling on sheet and final cooling on rack.
Make-ahead & scaling
- To make ahead, wrap logs tightly and store in the fridge up to 3 days, or freeze up to 3 months. Slice from frozen; add a minute or two to the bake time if still partially frozen.
- To double the recipe, use a large bowl and mix in batches if your mixer is small. Chill logs on a tray so they set evenly.
Keep-It-Fresh Plan
- Store completely cooled cookies in an airtight container at room temperature for up to 5 days.
- If cookies are glazed, separate layers with parchment paper to prevent sticking.
- For longer storage, freeze baked cookies in a single layer until solid, then transfer to a freezer-safe container for up to 3 months. Thaw at room temperature.
- Baked cookies reheat well for 6–8 seconds in the microwave to soften slightly, but be careful not to melt the topping.
Handy Q&A
- Q: Can I use crunchy peanut butter? A: You can, but expect slightly more texture in the dough. The recipe calls for creamy for uniform slices.
- Q: Can I skip the chocolate coating? A: Yes. The cookies are tasty plain; the coating is optional for extra richness and presentation.
- Q: Why no salt listed? A: The recipe relies on the butter and peanut butter for seasoning. If using unsalted butter and want a touch more contrast, sprinkle a light pinch of flaky sea salt on the chocolate while it’s wet.
- Q: Can I bake slices from frozen? A: Yes—add 1–2 minutes to the bake time and watch for the glossy sheen to fade as the doneness cue.
Save & Share
- Freeze dough logs wrapped in plastic wrap and then foil for long-term convenience—slice directly from the freezer for fresh cookies anytime.
- Package baked cookies between parchment layers in a sturdy tin for gifting, or arrange on a platter with a small bowl of extra melted chocolate for dipping at parties.
- If you try a garnish variation you love, jot it on the wrapped dough so future batches match the favorite.

Slice and Bake Chocolate Peanut Butter Cookies
Ingredients
- 1 1/2 cups packed brown sugar (300 g)
- 1/2 cup unsalted butter softened (113 g)
- 1/2 cup creamy peanut butter no-stir brand recommended (133 g)
- 2 large eggs
- 1 teaspoon vanilla extract
- 2 cups all-purpose flour (224 g)
- 1/2 cup unsweetened cocoa powder (40 g)
- 2 teaspoons baking powder
- 1 cup chocolate chips (170 g)
- 1 tablespoon vegetable oil or shortening for melting chocolate
- 1 cup chopped peanuts or toppings toffee bits, toasted coconut, sprinkles, or similar for garnish
Instructions
- In a large bowl, beat the packed brown sugar, softened butter, and creamy peanut butter with a hand mixer until creamy, about 2 minutes.
- Add the eggs and vanilla extract and continue beating until fully incorporated.
- On low speed, add the all-purpose flour, unsweetened cocoa powder, and baking powder and beat until the dough is evenly mixed.
- Fold in the chocolate chips if they are not fully incorporated by the mixer.
- Divide the dough in half and shape each half into a log on a sheet of plastic wrap; wrap tightly and chill in the refrigerator until firm, about 4 hours or overnight (or freeze 1–2 hours to speed chilling).
- Preheat the oven to 350°F (175°C). Line baking sheets with parchment paper or silicone mats.
- Working with one chilled dough log at a time, slice into 1/4-inch thick rounds and place them about 2 inches apart on prepared baking sheets.
- Bake for 8–10 minutes, until the cookies just lose their glossy sheen. Let cool on the baking sheet for 10 minutes, then transfer to a wire rack to cool completely.
- Place the chocolate chips and oil or shortening in a microwave-safe bowl and heat at 50% power, stirring every 30 seconds, until melted and smooth (about 2–3 minutes).
- Dip cooled cookies into the melted chocolate and immediately sprinkle with chopped peanuts or other toppings, or put the chocolate in a sandwich bag, snip a corner, and drizzle decoratively over cookies, then add toppings.
Equipment
- Mixing Bowl
- Hand Mixer
- Plastic Wrap
- Baking Sheet
- parchment paper or silicone baking mat
- Wire Rack
- Microwave-safe Bowl
- sandwich bag (optional for drizzling)
Notes
- Chill dough for 4 hours or overnight for best texture.
- To speed chilling, freeze logs for 1–2 hours.
- Bake until the cookies lose their glossy sheen to avoid overbaking.
- Chill dough logs upright in a glass to avoid a flat side.
- If using as gifts, cool completely before packaging.